< Previous | Contents | Next >
![]()
A window is a designated area on the screen. Every rectangular box on the screen is a window. While Medley supplies many of the windows (such as the Executive Window), you may also create your own. Among other things, you will type, draw pictures, and
save portions of your screen with windows.
Two important windows are available as soon as you enter the Medley environment.
One is the Executive Window, the main window where you will run your functions. It is the window that the caret is in when you turn on your machine, and load Medley. It is
shown in Figure 6-1.

Figure 6-1. Medley Executive Window
The other window that is open when you enter Medley is the "Prompt Window". It is the long thin black window at the top of the screen. It displays system prompts, or prompts you have associated with your programs. (See Figure 6-2.)

Figure 6-2. Prompt Window
Other programs, such as the editors, also use windows. These windows appear when
the program starts to run, and close (no longer appear on the screen) when the program is done running.
To create a new window, type: (CREATEW). The mouse cursor will change, and have a small square attached to it. (See Figure 6-3.)

Figure 6-3. Mouse Cursor Asking You to Sweep Out Window
There may be a prompt in the prompt window to create a window. Press and hold the left mouse button. Move the mouse around, and notice that it sweeps out a rectangle. When the rectangle is the size that you’d like your window to be, release the left mouse button. More specific information about the creation of windows, such as giving them
titles and specifying their size and position on the screen when they are created, is given in the WINDOWPROP section of Chapter 12.
Position the cursor inside the window you just created, and press and hold the right mouse button. A menu of commands should appear (do not release the right button!), like the one in Figure 6-4. To execute one of the commands on this menu, choose the item. Making a choice from a menu is explained in Chapter 3.
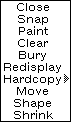
Figure 6-4 Right Button Default Window Menu
As an example, select "Move" from this menu. The mouse cursor will become a ghost window (ju st an outline of a window, the same size as the one you are moving), with a square attached to one corner, like the one shown in Figure 6-5.
![]()
Figure 6-5 Mouse Cursor for Moving a Window
Move the mouse around. The ghost window will follow. Click the left mouse button to place tho window in a new location.
Choose "Shape", and notice that you are prompted to sweep out another window. Your original window will have the shape of the window you sketch out.
The meaning of each right button default window menu item is explained below:
Close Removes the window from the screen
Snap Copies a portion of the screen into a new window Paint Allows drawing in a window
Clear Clears the window by erasing everything within the window boundaries Bury Puts the window beneath all other windows that overlap it
Redisplay Redisplays the window contents
Hardcopy Sends the contents of the window to a printer or to a flle Move Allows the wi ndow to be moved to a new spot on the screen Shape Repositions and/or reshapes the window
Shrink Reduces the window to a small black rectangle called an icon, or, if appropriate, to the shape for that window type (see Figure 6-6).

Figure 6-6 Example Icon
Expand Changes an icon back to its original window. Position the mouse cursor on the icon, depress the right button, and select Expand. Or, just button the icon with the middle mouse button.
These right-button default window menu selections are available in most windows, including the Executive Window. When the right button has other functions in a
window (as in an editor window), the right button default window menu should be accessible by pressing the Right button in the black border at the top of the window.
Some windows in Medley are "scrollable". This means that you can move the contents of the window up and down, or side to side, to see anything that doesn’t fit in the
window.
Point the mouse cursor to the left or bottom border of a window. If the window is scrollable, a "scroll bar" will appear. The mouse cursor will change to a double headed arrow. (See Figure 6-7.)

Figure 6-7. Scroll Bar of Scrollable Window
The scroll bar represents the full contents of the window. The example scroll bar is completely white because the window has nothing in it When a part of the scroll bar is shaded, the amount shaded represents the amount of the window’s contents currently
shown. If everything is showing, the scroll bar will be fully shaded. (See Figure 6-8.)
The position of the shading is also important. It represents the relationship of the
section currently diplayed to the the full contents of the window. For example, if the shaded section is at the bottom of the scroll bar, you are looking at the end of the file.
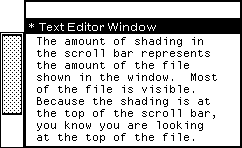
Figure 6-8 Top of File When Shading at Top of Scroll Bar
When the scroll bar is visible, you can control the section of the window’s contents displayed:
• To move the contents higher in the window (scroll the contents up in the window), press the leff button of the mouse, the mouse cursor changes to look like this:
![]()
Figure 6-9. Upward Scrolling Cursor
The contents of the window will scroll up, making the line thit the cursor is beside the topmost line in the window.
• To move the contonts lower in the window (scroll the contents "down" in the window), press the right button of the mouse, and the mouse cursor changes to look like this:
![]()
Flgure 6-10. Downward Scrolling Cursor
The contents of the window scroll down, moving the line that is the topmost line in the window to beside the curtor.
• To show a specific section of the window’s contents, remember that the scroll bar represents the full contents of the window. Move the mouse cursor to the relative
position of the section you want to see (e.g., to the top of the scroll bar if you want to see the top of the window’s contents). Press the middle button of the mouse. The mouse cursor will look like this:
![]()
Figure 6-11 Proportional Scrolling Cursor
When you release the middle mouse button, the window’s contents at that relative position will be displayed.
The position of the mouse in the scroll bar defines how much of the window will be scrolled. If it is near the top, then only a little will be scrolled. If it is near the bottom, most of the window will be scrolled.
Prints an expression to the black prompt window.
For example, type
(PROMPTPRINT "THIS WILL BE PRINTED IN THE PROMPT WINDOW")
The message will appear in the prompt window. (See Figure 6-12.)

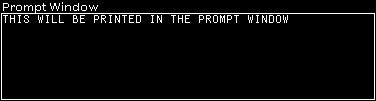
Figure 6-12 PROMPTPRINTing
Returns as a value the name of the window that the mouse cursor IS in.
(WHICHW) can be used as an argument to any function expecting a window, or to
reclaim a window that has no name (that is not attached to some particular part of the program.).