< Previous | Contents | Next >
![]()
Once you have logged in to Medley, you are in Lisp. The functions you type into the
Executive Window will now execute, that is, perform the designated task. Lisp is case-
sensitive; it often matters whether text is typed in upper- or lowercase letters. Use the Shift-Lock key on your keyboard to ensure that everything typed is in capital letters.
You must type all Lisp functions in parentheses. The Lisp interpreter will read from the left parenthesis to the closing right parenthesis to determine both the function you want to execute and the arguments to that function. Executing this function is called
"evaluation." When the function is evaluated, it returns a value, which is then printed in the Executive Window. This entire process is called the read-eval-print loop, and is how most Lisp interpreters, including the one for Lisp, run.
The prompt in is a number followed by a left-pointing arrow (see Figure 2.3). This number is the function’s position on the History List—a list that stores your
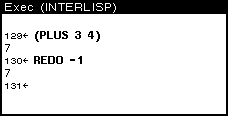
interactions with the Lisp interpreter. Type the function (PLUS 3 4) , and notice the History List assigns to the function (the number immediately to the left of the arrow).
Lisp reads in the function and its arguments, evaluates the function, and then prints the number 7.
In addition to this read-eval-print loop, there is also a "programmer’s assistant." It is the programmer’s assistant that prints the number as part of the prompt in the
executive window, and uses these numbers to reference the function calls typed after them.
When you issue commands to the programmer’s assistant, you will not use parentheses as you do with ordinary functiion calls. You simply type the command, and some
specification that indicates which item on the history list the command refers to. Some programmer’s assistant commands are FIX, REDO, and UNDO. They are explained in
detail below.
Programmer’s assistant commands are useful only at the Lisp top level, that is, when you are typing into the Executive Window. They do not work in user-defined functions.
As an example use of the programmer’s assistant, use REDO to redo your function call
(PLUS 3 4). Type REDO at the prompt (programmer’s assistant commands can be
typed in either upper- or lowercase) , then specify the previous expression in one of the following ways:
• When you originally typed in the function you now want to refer to, there was a
History List number to the left of the arrow in the prompt. Type this number after the programmer’s assistant command. This is the method illustrated in Figure 2-1.

Figure 2-1. Using a Programmer’s Assistant Command to REDO a Function
• A negative number will specify the function call typed in that number of prompts dago. In this example, you would type in -1, the position immediately before the current position. This is shown in Figure 2-2.

Figure 2-2. Using a Negative Number after the Programmer’s Assistant Command
• You can also specify the function for the programmer’s assistant with one of the items that was in that function call. The programmer’s assistant will search
backwards in the History List, and use the first function it finds that includes that
item. For example, type REDO PLUS to have the functiion (PLUS 3 4) reevaluated.
• If you type a programmer’s assistant cmmand without specifying a function (i.e., simply typing the command, following by a Return), the programmer’s assistant executes the command using the function entered at the previous prompt.
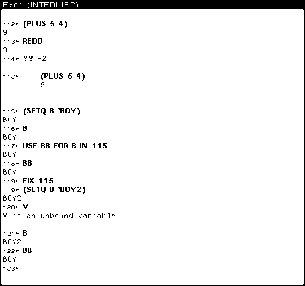
Figure 2-3 shows a few more examples of how to use the programmer’s assistant.

Figure 2-3. Some Applications of the Programmer’s Assistant
Editing in the Executive Window is explained in detail in Chapter 7. In the following section, only a few of the most useful commands are repeated.
To move the caret to a new place in the command being typed, point the mouse cursor at the appropriate position. Then press the left mouse button.
To move the caret back to the end of the command being typed, press Control-X (hold the Control key down, and type X).
To delete:
Character behind the caret Press the Backspace key
Word behind the caret Press Control-W (hold the Control key down and type
W)
Any part of the command Move the caret to the appropriate place in the
command. Hold the right mouse button down and move the the mouse cursor over the text. All of the
blackened text between the caret and mouse cursor is deleted when you release the right mouse button.
Entire command Press Control-U (hold the Control key down and type
U)
Deletions can be undone. J ust press the UNDO key.
To add more text to the line, move the carent to the appropriate position and start to type. Whatever you type will appear at the caret.
[This page intentionally left blank]
![]()