< Previous | Contents | Next >
![]()
A bitmap is a rectangular array of dots. The dots are called "pixels" (for picture
elements). Each dot, or pixel, is represented by a single bit. When a pixel or bit is turned on (i.e. that bit set to 1), a black dot is inserted into a bitmap. If you have a bitmap of a floppy on your screen (Figure 14-1), then all of the bits in the area that make up the floppy are turned on, and the surrounding bits are turned off.

Figure 14-1. Bitmap of a Floppy
BITMAPCREATE creates a bitmap, even though it can’t be seen.
(BITMAPCREATE width height)
If the width and height are not supplied, the system will prompt you for them.
EDITBM edits the bitmap. The syntax of the function is:
(EDITBM bitmapname)
Try the following to produce the results in Figure 14-4:
(SETQ MY.BITMAP (BITMAPCREATE 60 40)) EDITBM MY.BITMAP)
To dra w In the bitmap, move the mouse into the gridded section of the bitmap editor, and press and hold the leff mouse button. Move the mouse around to turn on the bits
represented by the spaces in the grid. Notice that each space in the grid represents one pixel on the bitmap
To erase Move the mouse into the gridded section of the bitmap editor, and press and hold the center mouse button. Move the mouse around to turn off the bits represented by the spaces in the gridded section of the bitmap editor.
To w ork on a different section Point with the mouse cursor to the picture of the
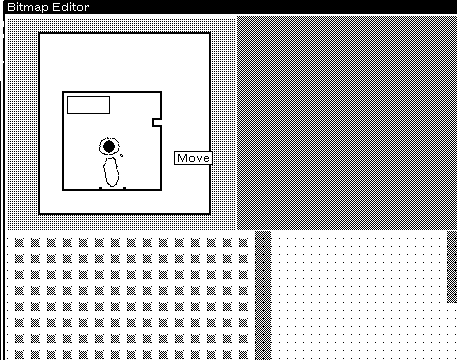
actual bitmap (the upper left corner of the bitmap editor). Press and hold the left mouse button. A menu with the single item, Move will appear. (See Figure 14-2.) Choose this
item.

Figure 14-2. Menu with Single Item (Move)
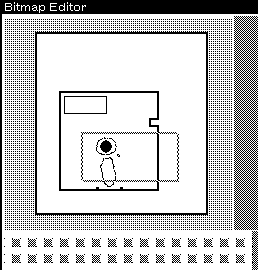
You will be asked to position a ghost window over the bitmap. This ghost window
represents the portion of the bitmap that you are currently editing. Place it over the
section of the bitmap that you wish to edit and click the left mouse button (see Figure 14-3).

Figure 14-3. Ghost Window Awaiting Positioning
To end the session, bring the mouse cursor into the upper-right portion of the window (the grey area) and press the center button. Select OK from the menu to save your
artwork.

Figure 14-4. Editing a Bitmap
BITBLT is the primitive function for moving bits (or pixels) from one bitmap to another.
It extracts bits from the source bitmap, and combines them in appropriate ways with those of the destination bitmap. The syntax of the function is:
(BITBLT sourcebitmap sourcelefl sourcebottom destinationbitmap destinationleft destinationbottom width height sourcetype operation texture clippIngregion)
Here’s how it’s done —using MY.BITMAP as the sourcebitmap and MY.WlNDOW as the destinationbitmap.
(BITBLT MY.BITMAP NIL NIL
MY.WINDOW NIL NIL NIL NIL ‘INPUT ‘REPLACE)
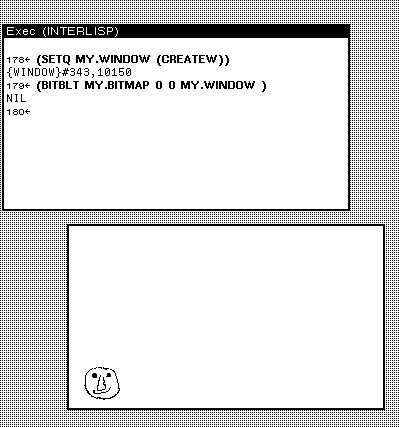
Note that the destination bitmap can be, and usually is, a window. Actually, it is the bitmap of a window, but the system handles that detail for you. Because of the NILs
(meaning "use the default"), MY.BITMAP will be BITBLT’d into the lower right corner of
MY.WlNDOW (see Figure 14-5).

Figure 14-5. BITBLT ing a Bitmap onto a Window Here is what each of the BITBLT arguments to the function mean:
sourcebitmap The bitmap to be moved into the destinationbitmap
sourceleft A number, starting at 0 for the left edge of the
sourcebitmap, that tells BITBLT where to start moving pixels from the sourcebitmap. For example, if the leftmost 10 pixels of sourcebitmap were not to be moved, sourceleft should be 10. The default value is 0.
sourcebottom A number, starting at 0 for the bottom edge of the
sourcebitmap, that tells BITBLT where to start moving pixels from the sourcebitmap. For example, if the bottom 10 rows of pixels of sourcebitmap were not to be moved, sourcebottom should be 10 The default value is 0.
destinationbitmap The bitmap that will receive the sourcebitmap. This is
often a window (actually the bitmap of a window, but Interlisp-D takes care of that for you).
destinationleft A number, starting at 0 for the left edge of the
destinationbitmap, that tells BITBLT where to start placing pixels from the sourcebitmap. For example, to place the
sourcebitmap 10 pixels in from the left, destinationleft should be 10. The default value is 0.
destinationbottom A number, starting at 0 for the bottom edge of the
destinationbitmap, that tells BITBLT where to start placing pixels from the sourcebitmap. For example, to place the
sourcebitmap 10 pixels up from the bottom,
destinationbottom should be 10. The default value is 0.
width How many pixels in each row of sourcebitmap should be moved. The samc amount of space is used in
destinationbitmap to receive the sourcebitmap. If this
argument is NIL, it defaults to the number of pixels from sourceleft to the end of the row of sourcebitmap.
height How many rows of pixels of sourcebitmap should be moved.
The same amount of space is used in destinationbitmap to receive the sourcebitmap. If this argument is NIL, it
defaults to the number of rows from sourcebottom to the top of the sourcebitmap.
sourcetype Refers to one of three ways to convert the sourcebitmap for
writing. For now, just use ’INPUT.
operation Refers to how the sourtebitmap gets BITBLT ’d on to the destinationbitmap. ’REPLACE will BLT the exact
sourcebitmap. Other operations allow you to AND, OR or XOR the bits from the sourcebitmap onto the bits on the destinationbitmap.
texture J ust use NIL for now.
clippingregion J ust use NIL for now.
For more information on these operations, see Chapter 27 in the IRM.