![]()
![]()
![]()
Address comments to:
Venue
User Documentation 1549 Industrial Road
San Carlos, CA 94070 415-508-9672
![]()
Medley for the Novice Release 2.0
February 1992
Copyright 1992 by Venue. All rights reserved.
Medley is a trademark of Venue.
Xerox is a registered trademark and InterPress is a trademark of Xerox Corporation.
UNIX is a registered trademark of UNIX System Laboratories. Post Script is a registered trademark of Adobe Systems Inc.
Copyright protection includes material generated from the
software programs displayed on the screen, such as icons, screen display looks, and the like.
![]()
The information in this document is subject to change without notice and should not be construed as a commitment by Venue. While every effort has been made to ensure the accuracy of this document, Venue assumes no responsibility for any errors that may appear.
Text was written and produced with Venue text formatting tools; Xerox printers were used to produce text masters. The typeface is Classic.
![]()
The following definitions will acquaint you with general terms used throughout this primer. You will probably want to read through them now, and use this chapter as a reference while you read through the rest of the primer.
advising A Medley facility for specifying function modifications without necessarily knowing how a particular function works or even what it does. Even system functions can be changed with
advising.
argument A piece of information given to a Lisp function so that it can execute successfully. When a function is explained in the
primer, the arguments that it requires will also be given. Arguments are also called Parameters.
atom The smallest structure in Lisp; like a variable in other
programming languages, but can also have a property list and a function definition.
Background Menu The menu that appears when the mouse is not in any window and the right mouse button is pressed.
binding The value of a variable. It could be either a local or a global variable. See unbound.
bitmap A rectangular array of "pixels," each of which is on or off representing one point in the bitmap image.
BREAK An Lisp function that causes a function to stop executing, open a Break window, and allows you to find out what is happening while the function is halted.
Break Window A window that opens when an error is encountered while
running your program (i.e., when your program has broken).
There are tools to help you debug your program from this window. This is explained further in Chapter 14.
browse To examine a data structure by use of a display that allows you to "move" around within the data structure.
button (1) (n.) A key on a mouse.
(2) (v.t.) To press one of the mouse keys when making a selection.
CAR A function that returns the head or first element of a list. See
CDR.
caret The small blinking arrowhead that marks where text will appear when it is typed in from the keyboard.
CDR A function that returns the tail (that is, everything but the first element) of a list. See CAR.
CLlSP A mechanism for augmenting the standard Lisp syntax. One such augmentation included in Interlisp is the iterative
statement. See Chapter 9. cr Press your Return key.
datatype (1) The kind of a datum. In Interlisp, there are many system- defined datatypes, e.g., Floating-Point, Integer, Atom, etc.
(2) A datatype can also be user-defined. In this case, it is like a record made up from system types and other user-defined datatypes.
DWIM "Do-what-I-mean." Many errors made by Medley users could be corrected without any information about the purpose of the program or expression in question (e.g., misspellings, certain kinds of parenthesis errors). The DWIM facility is called
automatically whenever an error occurs in the evaluation of an Interlisp expression. If DWIM is able to make a correction, the computation continues as though no error had occurred; otherwise, the standard error mechanism is invoked.
error Occasionally, while a program is running, an error may occur which will stop the computation. Interlisp provides extensive facilities for detecting and handling error conditions, to
enable the testing, debugging, and revising of imperfect programs.
evaluate or EVAL To find the value of a form. For example, if the variable X is bound to 5, we get 5 by evaluating X. Evaluation of a Lisp function involves evaluating the arguments and then
applying the function.
Executive Window This is your main window, where you will run functions and
develop your programs. This is the window that the caret is in when you turn on your machine and load Medley.
file package A set of functions and conventions that facilitate the bookkeeping involved with working in a large system consisting of many source code files and their compiled counterparts. Essentially, the file package keeps track of
where things are and what things have changed. It also keeps track of which files have been modified and need to be
updated and recompiled.
form Another way of saying s-expression. A Lisp expression that can be evaluated.
function A piece of Lisp code that executes and returns a value. history The programmer’s assistant is built around a memory
structure called the history list. The history functions (e.g.
FIX, UNDO, REDO) are part of this assistant. These operations allow you to conveniently rework previously specified
operations.
History List As you type on the screen, you will notice a number followed by a slash, followed by another number. The first number is the exec number, the second is the event number. Each
number, and the information on that line, is stored
sequentially as the History List Using the History List, you
can easily reexecute lines typed earlier in a work session. See Chapter 2.
icon A pictorial representation, usually of a shrunken window.
inspector An interactive display program for examining and changing the parts of a data structure. Medley has inspectors for lists and other data types.
iterative statement (also called i.s.) A statement in Interlisp that repetitively
executes a body of code For example, (for x from l to 5 do (PRlNT x)) is an i.s.
iterative variable (also called i.v.) Usually, an iterative statement is controlled by the value that the i.v. takes on. In the iterative statement
example above, x is the iterative variable because its value is being changed by each cycle through the loop. All iterative
variables are local to the iterative statement where they are defined.
Lisp Family of languages invented for "list processing." These languages have in common a set of basic primitives for
creating and manipulating symbol structures. Interlisp-D is an implementation of the Lisp language together with an
environment (set of tools) for programming, and a set of packages that extend the functionality of the system.
list A collection of atoms and lists; a list is denoted by surrounding its contents with a pair of parentheses.
Masterscope A program analysis tool. When told to analyze a program,
Masterscope creates a database of information about the
program. In particular, Masterscope knows which functions call other functions and which functions use which variables.
Masterscope can then answer questions about the program and display the information with a browser.
menu A way of graphically presenting you with a set of options.
There are two kinds of menus: pop-up menus are created
when needed and disappear after an item has been selected; permanent menus remain on the screen after use until
deliberately closed.
mouse The mouse is the box attached to your keyboard. It controls the movement of the cursor on your screen. As you become
familiar with the mouse, you will find it much quicker to use the mouse than the keyboard.
Mouse Cursor The small arrow on the screen that points to the northwest.
Mouse Cursor Icons Four types of mouse cursor icons are shown below.
![]() Wait. The processor is busy.
Wait. The processor is busy.
![]() The Mouse Confirm Cursor. It appears when you have to confirm that the choice you just made was correct. If it was, press the left button. If the choice was not correct, press the right button to abort.
The Mouse Confirm Cursor. It appears when you have to confirm that the choice you just made was correct. If it was, press the left button. If the choice was not correct, press the right button to abort.
![]()
This means "sweep out" the shape of the window. To do this, move the mouse to a position where you want a corner. Press the left mouse button, and hold it down. Move the mouse
diagonally to sketch a rectangle. When the rectangle is the desired size and shape, release the left button.
![]()
This is the "move window" prompt. Move the mouse so that the large "ghost" rectangle is in the position where you want the window. When you click the left mouse button, the
window will appear at this new location.
NIL NIL is the Lisp symbol for the empty list. It can also be represented by a left parenthesis followed by a right
parenthesis ( ). It is the only expression in Lisp that is both an atom and a list.
pixel Pixel stands for "picture element." The computer monitor
screen is made up of a rectangular array of pixels. Each pixel corresponds to one bit. When a bit is turned on (i.e., set to 1), the pixel on the screen represented by this bit is black.
pretty printing Pretty printing refers to the way Lisp functions are printed with special indentation, to make them easier to read.
Functions are pretty printed in the structure editor, SEdit
(see Chapter 7). You can pretty print uncompiled functions by calling the function PP with the function you would like to
see as an argument, i.e. (PP function-name). For an example of this, see Figure 1.5.
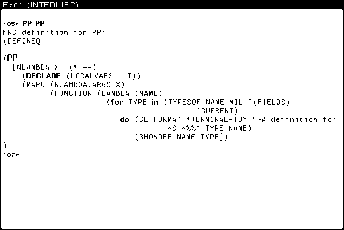
Figure 1.5. Example of Pretty Printing Function PP
Programmer’s
Assistant The programmer’s assistant accesses the History List to allow you to FIX, UNDO, and/or REDO your previous expressions
typed to the executive window (see Chapter 2).
Prompt Window The narrow black window at the top of the screen. It displays system prompts, or prompts you have developed (see Figure 1.6).

Figure 1.6. Prompt Window
property list A list of the form ( <property-namel> <property-value1>
<property-name2> <property-value2> ....) associated with an atom. It accessed by the functions GETPROP and PUTPROP.
record A record is a data structure that consists of named "fields".
Accessing elements of a record can be separated from the details of how the data structure is actually stored. This
eliminates many programming details. A record definition
establishes a record template, describing the form of a record. A record instance is an actual record storing data according to a particular record template. (See datatype, second
definition.)
Right Button Default
Window Menu This is the menu that appears when the mouse is in a
window, and the right mouse button is pressed. It looks like the menu in Figure 1.7. If this menu does not appear when you press the right button of the mouse and the mouse is in
the window, move the mouse so that it is pointing to the title bar of the window, and press the right button.

Figure 1.7. Right Button Default Window Menu
s-expression Short for "symbolic expression". In Lisp, this refers to any well-formed collection of left parentheses, atoms, and right parentheses.
stack A pushdown list. Whenever a function is entered, information about that specific function call is pushed onto (i.e., added to
the front of) the stack. This information includes the variable names and their values associated with the function call.
When the function is exitted, that data is popped off the stack.
sysout A flle containing a whole Lisp environment: namely,
everything you defined or loaded into the environment, the windows that appeared on the screen, the amount of memory
used, and so on. Everything is stored in the sysout file exactly as it was when the function SYSOUT was called.
TRACE A function that creates a trace of the execution of another
function. Each time the traced function is called, it prints out the values of the arguments it was called with, and prints out the value it returns upon completion.
unbound Without value; an atom is unbound if a value has never been assigned to it.
window A rectangular area of the screen that acts as the main display area for some Lisp process,
![]()
It was dawn and the local told him it was down the road a piece, left at the first fishing bridge in the country, right at the appletree stump, and onto the dirt road just before the hill. At midnight he knew he was lost. -Anonymous
Welcome to the Medley Lisp Development Environment, a collection of powerful tools for assisting you in programming in Lisp, developing sophisticated user interfaces, and creating prototypes of your ideas in a quick and easy manner. Unfortunately, along
with the power comes mind-numbing complexity. The Medley documentation set
describes all the tools in detail, but it would be unreasonable for us to expect a new user to wade through all of it, so this primer is intended as an introduction, to give you a
taste of some of the features.
We developed this primer to provide a starting point for new Medley users, to enhance your excitement and challenge you with the potential before you. We’re going to make some assumptions about you. For starters, we’re going to assume that you’re sitting at a workstation that can run Medley. All of the examples in the book figure that you’re
going to want to try things out. We’re also going to assume that you’ve had some exposure to Lisp, hopefully Common Lisp.
Medley actually consists of two complete Lisp implementations, Common Lisp and InterLisp. All the screen I/O and some of the system functions are in InterLisp.
However, thanks to the package system, you can call back and forth between the two languages by simply including a package delimiter in front of a symbol name. This sounds complicated, but it will become clearer once we do some examples.
Throughout we make reference to the lnterlisp-D Reference Manual by section and page number. The material in the primer is just an introduction. When you need more depth, use the detailed treatment provided in the manual.
While only you can plot your ultimate destination, you will flnd this primer
indispensable for clearly defining and guiding you to the first landmarks on your way.
Acknowledgements
The early inspiration and model for this primer came from the Intelligent Tutoring
Systems group and the Learning Research and Development Center at the University of Pittsburgh. We gratefully acknowledge their pioneering contribution to more effective
artificial intelligence.
This primer was originally developed by Computer Possibilities, a company committed to making Al technology available. Primary development and writing was done by
Cynthia Cosic, with technical writing support provided by Sam Zordich. It has been re- done by Venue staff to reflect changes in the environment since the original publication.
At Xerox Artificial Intelligence Systems, John Vittal managed and directed the project. Substantial assistance was provided by many members of the AlS staff who provided both editorial and systems support.
![]()
Medley for the Novice, Release 2.0
vii
PREFACE
[This page intentionally left blank]
![]()
viii Medley for the Novice, Release 2.0
![]()
Once you have logged in to Medley, you are in Lisp. The functions you type into the
Executive Window will now execute, that is, perform the designated task. Lisp is case-
sensitive; it often matters whether text is typed in upper- or lowercase letters. Use the Shift-Lock key on your keyboard to ensure that everything typed is in capital letters.
You must type all Lisp functions in parentheses. The Lisp interpreter will read from the left parenthesis to the closing right parenthesis to determine both the function you want to execute and the arguments to that function. Executing this function is called
"evaluation." When the function is evaluated, it returns a value, which is then printed in the Executive Window. This entire process is called the read-eval-print loop, and is how most Lisp interpreters, including the one for Lisp, run.
The prompt in is a number followed by a left-pointing arrow (see Figure 2.3). This number is the function’s position on the History List—a list that stores your
interactions with the Lisp interpreter. Type the function (PLUS 3 4) , and notice the History List assigns to the function (the number immediately to the left of the arrow).
Lisp reads in the function and its arguments, evaluates the function, and then prints the number 7.
In addition to this read-eval-print loop, there is also a "programmer’s assistant." It is the programmer’s assistant that prints the number as part of the prompt in the
executive window, and uses these numbers to reference the function calls typed after them.
When you issue commands to the programmer’s assistant, you will not use parentheses as you do with ordinary functiion calls. You simply type the command, and some
specification that indicates which item on the history list the command refers to. Some programmer’s assistant commands are FIX, REDO, and UNDO. They are explained in
detail below.
Programmer’s assistant commands are useful only at the Lisp top level, that is, when you are typing into the Executive Window. They do not work in user-defined functions.
As an example use of the programmer’s assistant, use REDO to redo your function call
(PLUS 3 4). Type REDO at the prompt (programmer’s assistant commands can be
typed in either upper- or lowercase) , then specify the previous expression in one of the following ways:
When you originally typed in the function you now want to refer to, there was a
History List number to the left of the arrow in the prompt. Type this number after the programmer’s assistant command. This is the method illustrated in Figure 2-1.
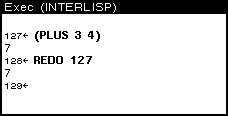
Figure 2-1. Using a Programmer’s Assistant Command to REDO a Function
A negative number will specify the function call typed in that number of prompts dago. In this example, you would type in -1, the position immediately before the current position. This is shown in Figure 2-2.
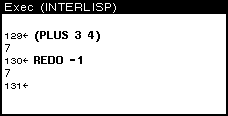
Figure 2-2. Using a Negative Number after the Programmer’s Assistant Command
You can also specify the function for the programmer’s assistant with one of the items that was in that function call. The programmer’s assistant will search
backwards in the History List, and use the first function it finds that includes that
item. For example, type REDO PLUS to have the functiion (PLUS 3 4) reevaluated.
If you type a programmer’s assistant cmmand without specifying a function (i.e., simply typing the command, following by a Return), the programmer’s assistant executes the command using the function entered at the previous prompt.
Figure 2-3 shows a few more examples of how to use the programmer’s assistant.
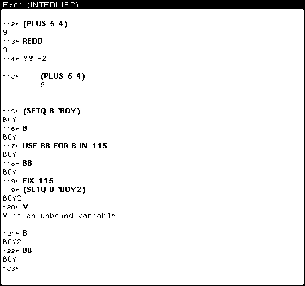
Figure 2-3. Some Applications of the Programmer’s Assistant
Editing in the Executive Window is explained in detail in Chapter 7. In the following section, only a few of the most useful commands are repeated.
To move the caret to a new place in the command being typed, point the mouse cursor at the appropriate position. Then press the left mouse button.
To move the caret back to the end of the command being typed, press Control-X (hold the Control key down, and type X).
To delete:
Character behind the caret Press the Backspace key
Word behind the caret Press Control-W (hold the Control key down and type
W)
Any part of the command Move the caret to the appropriate place in the
command. Hold the right mouse button down and move the the mouse cursor over the text. All of the
blackened text between the caret and mouse cursor is deleted when you release the right mouse button.
Entire command Press Control-U (hold the Control key down and type
U)
Deletions can be undone. J ust press the UNDO key.
To add more text to the line, move the carent to the appropriate position and start to type. Whatever you type will appear at the caret.
[This page intentionally left blank]
![]()
Preface vii
Brief Glossary 1-1
Typing Shortcuts
Programmer’s Assistant 2-1
If You Make a Mistake 2-2
Using Menus
Making a Selection from a Menu 3-1
Explanations of Menu Items 3-2
Submenus 3-2
Summary 3-3
How to Use Files
Types of Files 4-1
Directories 4-1
Directory Options 4-2
Subdirectories 4-2
To See What Files Are Loaded 4-3
Simple Commands for Manipulating Files 4-3
Connecting to a Directory 4-3
File Version Numbers 4-4
FileBrowser
Calling the FileBrowser 5-1
FileBrowser Commands 5-3
Those Wondertul Windows!
Windows Provided by Medley 6-1
Creating a Window 6-2
Right Button Default Window Menu 6-2
Explanation of Each Menu Item 6-3
Scrollable Windows 6-4
Other Window Functions 6-5
PROMPTPRlNT 6-5
WHlCHW 6-6
Editing and Saving
Defining Functions 7-1
Simple Editing in the Executive Window 7-2
Using the List Structure Editor 7-3
Commenting Functions 7-4
File Functions and Variables: How to See and Save Them 7-5
File Variables 7-5
Saving Interlisp-D on Files 7-5
Your Init File
Using the USERGREETFILES Variable 8-1
Making an Init File 8-1
Medley Forgiveness: DWIM 9-1
Break Package
Break Windows 10-1
Break Package Examples 10-1
Ways to Stop Execution from the Keyboard (Breaking Lisp) 10-3
Break Menu 10-3
Returning to Top Level 10-4
WhatTo Do lf 11-1
Window and Regions
Windows 12-1
CREATEW 12-1
WlNDOWPROP 12-2
Getting Windows to Do Things 12-3
BUTTONEVENTFN 12-5
Looking at a Window’s Properties 12-5
Regions 12-5
What Are Menus?
Displaying Menus 13-1
Getting Menus to Do Stuff 13-2
WHENHELDFN and WHENSELECTEDFN Fields of a Menu 13-3
Looking at a Menu’s Fields 13-5
Bitmaps 14-1
Displaystreams
Drawing on a Displaystream 15-1
DRAWUNE 15-1
DRAWTO 15-2
DRAWCIRCLE 15-3
FILLCIRCLE 15-1
Locating and Changing Your Position in a Displaystream 15-4
DSPXP0SITION 15-5
DSPYPOSlTION 15-5
MOVETO 15-5
Fonts
What Makes Up a Font 16-1
Fontdescriptors and FONTCREATE 16-2
Display Fonts 16-3
InterPress Fonts 16-3
Functions for Using Fonts 16-4
FONTPROP - Looking at Font Properties 16-4
STRINGWlDTH 16-5
DSPFONT- Changing the Font in One Window 16-5
Personalizing Your Font Profile 16-6
The Inspector
Calling the Inspector 17-1
Using the Inspector 17-2
Inspector Example 17-2
Masterscope
SHOW DATA Command and GRAPHER 18-2
Where Does All the Time Go? SPY
How to Use Spy with the SPY Window 19-1
How to Use SPY from the Lisp Top Level 19-2
Interpreting SPY’s Results 19-2
Free Menus
Free Menu Example 20-1
Parts of a Free Menu Item 20-2
Types of Free Menu Items 20-3
The Grapher
Say it with Graphs 21-1
Add a Node 21-2
Add a Link 21-2
Delete a Link 21-2
Delete a Node 21-2
Move a Node 21-2
Making a Graph from a List 21-2
Incorporating Grapher into Your Program 21-2
More of Grapher 21-2
Resource Management
Naming Variables and Records 22-1
Some Space and Time Considerations 22-2
Global Variables 22-3
Circular Lists 22-3
When You Run Out of Space 22-4
Simple Interactions with the Cursor, a Bitmap, and a Window
GETMOUSESTATE Example Function 23-1
Advising GETMOUSESTATE 23-2
Changing the Cursor 23-2
Functions for Tracing the Cursor 23-3
Running the Functions 23-6
Glossary of Global System Variables
Directories 24-1
Flags 24-2
History Lists 24-3
System Menus 24-3
Windows 24-4
Miscellaneous 24-4
Other Useful References 25.1
Index.............................................................................................................................................. INDEX-1
[This page intentionally left blank]
![]()
The purpose of this chapter is to show you how to use menus. Many things can be done more easily using menus, and there are many different menus provided in the Medley
environment. Some are "pop-up" menus that are only available until a selection is made, then disappear until they are needed again. An example of one of these is the Background Menu that appears when the mouse is not in any window and the right
mouse button is pressed. A background menu is shown in Figure 3-1. Your background menu may have different items on it.
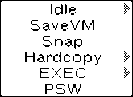
Figure 3-1. Background Menu
Another common pop-up menu is the right button default window menu. This menu is explained more in Chapter 6.
Other menus are more permanent, such as the menu that is always available for use with the Filebrowser. This menu is shown in Figure 3-2., and the specifics of its use with the filebrowser are explained in Chapter 5.
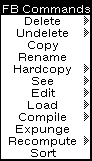
Figure 3-2. Filebrowser Menu
To make a selection from a menu, point with the mouse to the item you would like to select. If one of the mouse buttons is already pressed, the menu item should be
highlighted in reverse video. If it is a permanent menu, you must press the left mouse button to highlight the item. When you release the button,m the item will be selected. Figure 3-3 shows a menu with the item "Undo" chosen.

Figure 3-3. Menu with the Item "Undo" Chosen
Many menu items have explanations associated with the. If you are not sure what the consequences of choosing a particular menu iem will be, highlight the menu item but do not releast the left mouse button. If the menu item has an explanation associated with it, the explanation will be printed in the prompt window. Figure 3-4 shows the
explanation associated with the item "Snap" from the background menu.


Figure 3-4. Explanation Associated with Selected Menu Item
Some menu items have submenus associated with them. This means that, for these items, you can make even more precise choices if you would like to.
A submenu can also be foun d as described below.
As shown in Figure 3-5, a submenu can be indicated by a gray arrow to the right of the menu item. To see the submenu, highlight the menu item and move the mose to the
right to follow the arrow. Choosing an item from a submenu is done the same way you make a choice from the menu. Any submenus that might be associated with the items in the submenu are indicated in the same way as the submenus associated with the
items in the menu.
3. USING MENUS
![]()

Figure 3-5. Edit Submenu Displayed with Right Arrow
In summary, here are a few rules of thumb to remember about the interactions of the mouse and system menus:
Press the left mouse button to select a menu item
Press the middle mouse button to get more options on a submenu
Press the right mouse button to see the default right button window menu, and the background menu
[This page intentionally left blank]
![]()
A program file, or Lisp file, contains a series of expressions that can be read and
evaluated by the Lisp interpreter. These expressions can include function or macro
definitions, variables and their values, properties of variables, and so on. How to save Interlisp-D expressions on these files is explained in Chapter 7. Loading a file is
explained in the Simple Commands for Manipulating Files section below.
Not all files, however, have Lisp expressions stored on them. For example, TEdit files store text; sketches are stored on files made with the package Sketch , or can be
incorporated into TEdit files. These files are not loaded directly into the environment, but are accessed with the package used to create them, such as TEdit or Sketch.
When you name a file, there are conventions that you should follow. These conventions allow you to tell the type of file by the extension to its name.
Lisp expressions It should not have an extension or have the extension
.LISP. For example, a file called MYCODE should contain Lisp expressions.
Compiled Code It should have the extension .LCOM or .DFASL. For
example, a file called MYCODE.DFASL should contain compiled code.
A Sketch Its extension should be .SKETCH. For example, a file called MOUNTAINS.SKETCH should contain a Sketch.
Text It should have the extension .TEDIT. For example, a file called REPORT.TEDIT should contain text that can be edited with the editor TEDIT.
This section focu ses on how you can find files, and how you can easily manipulate files. To see all the files listed on a device, use the function DIR. For example, to see what files are stored in your current directory, type:
(DIR *.*)
Partial directory listings can be gotten by specifying a file name, rather than just a
device name. The wildcard character * can be used to match any number of unknown characters. For example, the command (DIR T*) will list the names of all files that begin with the letter T. An example using the wildcard is shown in Figure 4-1.
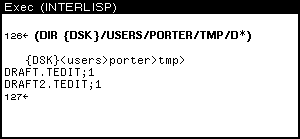
Figure 4-1. Using DIR with a Wildcard
Various words can appear as extra arguments to the DIR command. these words give you extra information about the files.
SIZE displays the size of each file in the directory. For example, type:
(DIR {DSK} SIZE)
DATE displays the creation date of each file in the directory. An example of this is shown in Figure 4-2.
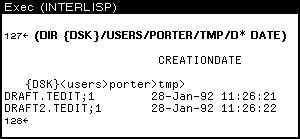
Figure 4-2. Example Using DATE DEL deletes all the files foun d by the directory command.
Sudirectories are very helpful for organizing files. A set of files that have a single
purpose (for example, all the external documentation files for a system) can be grouped together into a subdirectory.
To associate a subdirectory with a filename, simply include the desired subdirectory as part of the name of the file. Subdirectories are specified after the device name and
before the simple filename. The first subdirectory should be between less-than and
greater-than signs (angle brackets) < >, with nested subdirectory names only followed by a greater than sign >. For example:
{DSK}<Directory>SubDirectory>SubSubDirectory>...>filename
or use the UNIX convention:
{DSK}/Directory/Subdirectory/Subsubdirectory/filename
If you type FILELST<CR>, the names of all the files you loaded will be displayed. Type SYSFILES<CR> to see what files are loaded to create the sysout.
When using these functions, always be sure to specify the full filename, including subfile directories if appropriate.
To have the conents of a file displayed in a window:
(SEE ’filename)
To copy a file (see Figure 4-3):
(COPYFILE ’oldfilename ’newfilename)

Figure 4-3. Example Use of COPYFILE
To delete a file (see Figure 4-4):
(DELFILE ’filename)

Figure 4-4. Example Use of DELFILE
To rename a file:
(RENAMEFILE ’oldfilename ’newfilename)
Files that contain Lisp expressions can be loaded into the environment. That means that the information on them is read, evaluated, and incorporated into the Medley
environment. To load a file, type:
(LOAD ’filename)
Often, each person or project has a subdirectory where files are stored. If this is your situation, you will want any files you create to be put into this directory automatically. This means you should "connect" to the directory.
CONN is the Medley command that connects you to a directory. For example, CONN in Figure 4-5 connects you to the subsubdirectory IM, in the subdirectory PRIMER , the directory LISPFILES, on the device DSK. This information—the device and the
directory names down to the subdirectory to which you want to be connected—is called the "path" to that subdirectory. CONN expects the path to a directory as an argument.

Figure 4-5. CONNecting to Subdirectory Primer Subsubdirectory IM
Once you are connected to a directory, the command DIR will assume you want to see the files in that directory, or any of its subdirectories.
Other commands that require a filename as an argument (e.g., SEE, above) will assume that the file is in the connecteds directory if there is no path specified with the filename. This will often save you typing.
When stored, each filename is fillowed by a semicolon and a number, as shown in this example:
MYFILE.TEDIT;1
The number is the version number of the file. This is the system’s way of protecting your files from being overwritten. Each time the file is written, a new file is created with a version number one greater than the last. This new file will have everything from your previous file, plus all of your changes.
In most cases, you can exclude the version number when referencing the file. When the version is not specified, and there is more than one version of the file on that particular directory, the system generally uses your most recent version. An exception is the
function DELFILE, which deletes the oldest version (the one with the lowest version number) if none is specified.
[This page intentionally left blank]
![]()
The FileBrowser is a Lisp Library Package that works with files stored on disk and floppy devices, and can be used as a file directory editor. If it is not loaded into your sysout, you need to load it first by typing:
(LOAD ’FILEBROWSER.LCOM)
Calling the FileBrowser with the directory calls up the files stored in that directory:
(FB ’<usr>local>lde>)
Another way to call a FileBrowser is to choose "FileBrowser" from the background
menu. You will be prompted for a description of the files to be included (see Figure 5-1). Type an asterisk (*), then press Return to see all the files in the connected directory.
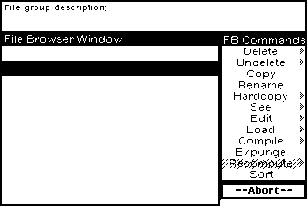
Figure 5-1. Prompt for Files to Include in FileBrowser
These show a directory of the device in a window you can leave on the screen at all times. The parts of the FileBrowser window are shown below.

Prompt Window
Command Menu
File List
Figure 5-2. Parts of a FileBrowser Window Now you do not need to continually type the directory command.
To use the FileBrowser, choose a file by pointing to the file with the mouse and pressing the left or middle mouse button. A small dark arrow appears to the left of the file
name. Choose a command from the menu at the right. In Figure 5-3, the files
OCH1.TEDIT;1, OCH10.TEDIT;1, and OCH11.TEDIT;1 have been selected.
The left mouse button only allows you to choose one file at a time. Even if you choose other files, only the last file you selected with the left mouse button will remain
marked as chosen. When you use the middle mouse button to select a file, the file is added to those already chosen.
To unpick an already chosen file, hold the Control key down while pressing the middle mouse button.

Figure 5-3. Files Chosen
FILEBROWSER
![]()
The next section contains a summary of the FileBrowser commands.
Delete In the FileBrowser, this command marks a file, or files, for deletion (see Figure 5-4). These files are marked by a black line crossing through
them. You may select and mark any number of files for deletion. Delete does not actually remove these files from the device. The Expunge command actually wipes out the files previously marked for deletion.
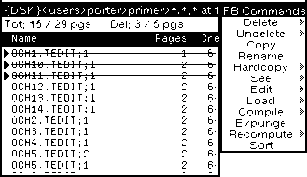
Figure 5-4. Files Marked for Deletion
Undelete Undoes the delete command for one or more files. Undelete erases the black line through a file marked for deletion.
Copy This command copies the chosen file. The destination filename should
be typed at a prompt that appears in the window above the FileBrowser.
Wildcards do not work for this prompt. You must type the whole
unquoted filename. If more than one file is chosen to be copied, you will be prompted for a directory name. The files will be copied into the
directory you give, but with the same filenames as the ones they have in their original location.
Rename This command works much like the Copy command, but does not leave the original file. The chosen file will be renamed to the destination
filename. You will be prompted, in the prompt window, for the
destination filename. Give the complete unquoted filename. If more
than one file is chose to be renamed, you will be prompted for a directory name. The files will be moved into the directory you give.
Hardcopy If you do not have a hardcopy device, using this command causes an error. Otherwise, it gives a hardcopy of the file.
See Shows you a file in a window. To use this command, choose a single filename, then the See command. You are prompted for a window.
Each time the See command is chosen, a new window is opened to display the file.
Edit Calls the editor with the file as input. If the file is an executable one (i.e., Lisp code as opposed to a documentation file), only the FILECOMS list is edited. The FILECOMS list is the list of variables, lists, and
functions that are contained on that file. FileBrowser loads it and then allows you to edit the FILECOMS .
Load Choose a file with the left mouse button, or a group of files with the
middle mouse button. Once the filenames have been blackened, choose the Load command to load them all into Medley.
Compile This command calls the file compiler with the chosen filename(s) as arguments. The compiler compiles a file foun d on a storage device
({DSK}), not the functions defined in the Medley image. If any functions on a loaded file have been changed, run the function (MAKEFILE ’filename) to write the current version before compiling it. Files do not have to be loaded to use the Compile command.
Expunge This command completely deletes all the marked files from the
directory. This allows you to remove unwanted files from your storage device.
Recompute Choose this command when you know that the directory has been
changed and should be reread (e.g., after creating new versions of a file).
![]()
A window is a designated area on the screen. Every rectangular box on the screen is a window. While Medley supplies many of the windows (such as the Executive Window), you may also create your own. Among other things, you will type, draw pictures, and
save portions of your screen with windows.
Two important windows are available as soon as you enter the Medley environment.
One is the Executive Window, the main window where you will run your functions. It is the window that the caret is in when you turn on your machine, and load Medley. It is
shown in Figure 6-1.

Figure 6-1. Medley Executive Window
The other window that is open when you enter Medley is the "Prompt Window". It is the long thin black window at the top of the screen. It displays system prompts, or prompts you have associated with your programs. (See Figure 6-2.)

Figure 6-2. Prompt Window
Other programs, such as the editors, also use windows. These windows appear when
the program starts to run, and close (no longer appear on the screen) when the program is done running.
To create a new window, type: (CREATEW). The mouse cursor will change, and have a small square attached to it. (See Figure 6-3.)

Figure 6-3. Mouse Cursor Asking You to Sweep Out Window
There may be a prompt in the prompt window to create a window. Press and hold the left mouse button. Move the mouse around, and notice that it sweeps out a rectangle. When the rectangle is the size that you’d like your window to be, release the left mouse button. More specific information about the creation of windows, such as giving them
titles and specifying their size and position on the screen when they are created, is given in the WINDOWPROP section of Chapter 12.
Position the cursor inside the window you just created, and press and hold the right mouse button. A menu of commands should appear (do not release the right button!), like the one in Figure 6-4. To execute one of the commands on this menu, choose the item. Making a choice from a menu is explained in Chapter 3.
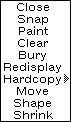
Figure 6-4 Right Button Default Window Menu
As an example, select "Move" from this menu. The mouse cursor will become a ghost window (ju st an outline of a window, the same size as the one you are moving), with a square attached to one corner, like the one shown in Figure 6-5.
![]()
Figure 6-5 Mouse Cursor for Moving a Window
Move the mouse around. The ghost window will follow. Click the left mouse button to place tho window in a new location.
Choose "Shape", and notice that you are prompted to sweep out another window. Your original window will have the shape of the window you sketch out.
The meaning of each right button default window menu item is explained below:
Close Removes the window from the screen
Snap Copies a portion of the screen into a new window Paint Allows drawing in a window
Clear Clears the window by erasing everything within the window boundaries Bury Puts the window beneath all other windows that overlap it
Redisplay Redisplays the window contents
Hardcopy Sends the contents of the window to a printer or to a flle Move Allows the wi ndow to be moved to a new spot on the screen Shape Repositions and/or reshapes the window
Shrink Reduces the window to a small black rectangle called an icon, or, if appropriate, to the shape for that window type (see Figure 6-6).

Figure 6-6 Example Icon
Expand Changes an icon back to its original window. Position the mouse cursor on the icon, depress the right button, and select Expand. Or, just button the icon with the middle mouse button.
These right-button default window menu selections are available in most windows, including the Executive Window. When the right button has other functions in a
window (as in an editor window), the right button default window menu should be accessible by pressing the Right button in the black border at the top of the window.
Some windows in Medley are "scrollable". This means that you can move the contents of the window up and down, or side to side, to see anything that doesn’t fit in the
window.
Point the mouse cursor to the left or bottom border of a window. If the window is scrollable, a "scroll bar" will appear. The mouse cursor will change to a double headed arrow. (See Figure 6-7.)

Figure 6-7. Scroll Bar of Scrollable Window
The scroll bar represents the full contents of the window. The example scroll bar is completely white because the window has nothing in it When a part of the scroll bar is shaded, the amount shaded represents the amount of the window’s contents currently
shown. If everything is showing, the scroll bar will be fully shaded. (See Figure 6-8.)
The position of the shading is also important. It represents the relationship of the
section currently diplayed to the the full contents of the window. For example, if the shaded section is at the bottom of the scroll bar, you are looking at the end of the file.
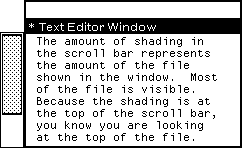
Figure 6-8 Top of File When Shading at Top of Scroll Bar
When the scroll bar is visible, you can control the section of the window’s contents displayed:
To move the contents higher in the window (scroll the contents up in the window), press the leff button of the mouse, the mouse cursor changes to look like this:
![]()
Figure 6-9. Upward Scrolling Cursor
The contents of the window will scroll up, making the line thit the cursor is beside the topmost line in the window.
To move the contonts lower in the window (scroll the contents "down" in the window), press the right button of the mouse, and the mouse cursor changes to look like this:
![]()
Flgure 6-10. Downward Scrolling Cursor
The contents of the window scroll down, moving the line that is the topmost line in the window to beside the curtor.
To show a specific section of the window’s contents, remember that the scroll bar represents the full contents of the window. Move the mouse cursor to the relative
position of the section you want to see (e.g., to the top of the scroll bar if you want to see the top of the window’s contents). Press the middle button of the mouse. The mouse cursor will look like this:
![]()
Figure 6-11 Proportional Scrolling Cursor
When you release the middle mouse button, the window’s contents at that relative position will be displayed.
The position of the mouse in the scroll bar defines how much of the window will be scrolled. If it is near the top, then only a little will be scrolled. If it is near the bottom, most of the window will be scrolled.
Prints an expression to the black prompt window.
For example, type
(PROMPTPRINT "THIS WILL BE PRINTED IN THE PROMPT WINDOW")
The message will appear in the prompt window. (See Figure 6-12.)

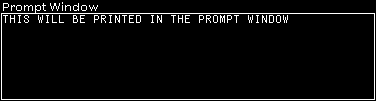
Figure 6-12 PROMPTPRINTing
Returns as a value the name of the window that the mouse cursor IS in.
(WHICHW) can be used as an argument to any function expecting a window, or to
reclaim a window that has no name (that is not attached to some particular part of the program.).
![]()
This chapter explains how to define functions, how to edit them, and how to save your work.
DEFUN can be used to define new functions. The syntax for it is:
(DEFUN (<functionname> (<parameter-list><body-of-function>))
New functions can be created with DEFUN by typing directly into the Executive Window. Once defined, a function is a part of the Medley environment. For example, the function EXAMPLE-ADDER is defined in Figure 7-1.
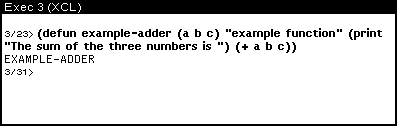
Figure 7-1. Defining the Function EXAMPLE-ADDER
Now that the function is defined, it can be called from the Executive Window:

Figure 7-2.. After EXAMPLE-ADDER is defined, it can he executed The function returns 6, after printing out the message.
Functions can also be defined using the editor DEdit described above. To do this, simply type
(ED function-name ’FUNCTIONS)
You will be told that no definition exists for the function, and a menu will pop up asking you what type of function you would like to create:
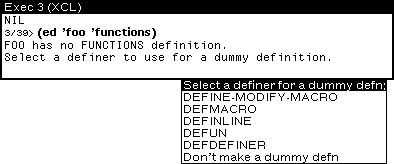
Figure 7-3 Selecting a Function Template
Selecting the appropriate type will pop up an editor window with a function template. The use of the editor is explained in the Using the List Structure Editor section below.
First, type in an example function to edit:
3/41> (defun your-first-function (a b) (if (> a b)
’(the first is greater) ’(the second is greater)))
To run the function, type:
3/42> (YOUR-FIRST-FUNCTION 3 5) (THE SECOND IS GREATER)
Now, let’s alter this. Type:
3/43> FIX 41
Note that your original function is redisplayed, and ready to edit. (See Figure 7-4.)

Figure 7-4. Using FIX to Edit a Fundion
Move the text cursor to the appropriate place in the function by positioning the mouse cursor and pressing the left mouse button.
Delete text by moving the caret to the beginning of the section to be deleted. Hold the right mouse button down and move the mouse cursor over the text. All of the
highlighted text between the caret and mouse cursor is deleted when you release the right mouse button.
If you make a mistake, deletions can be undone. Press the UNDO key on the keypad to the left of the keyboard.
Now change GREATER to BIGGER:
Position the mouse cursor on the G of GREATER , and click the left mouse button. The text cursor is now where the mouse cursor is.
Next, press the right mouse button and hold it down. Notice that if you move the mouse cursor around, it will blacken the characters from the text cursor to the mouse cursor. Move the mouse so that the word "GREATER " is highlighted.
Release the right mouse button and GREATER is deleted.
Without moving the cursor, type in BIGGER .
There are two ways to end the editing session and run the function. One is to type Control-X. (Hold the Control key down, and type X.) Another is to move the text
cursor to the end of the line and crø In both cases, the function has been edited!
Try the new version of the function by typing:
3/48> (YOUR-FIRST-FUNCTION 8 9) (THE SECOND IS BIGGER)
and get the new result, or you can type:
3/49> REDO 42
(THE SECOND IS BIGGER)
If the function you want to edit is not readily available (i.e. the function is not in the
Executive Window, and you can’t remember the history list number, or you simply have a lot of editing), use the List Structure Editor, often called SEdit. This editor is evoked with a call to ED:
81(ED ’YOUR-FIRST-FUNCTION ’FUNCTIONS)
Your function will be displayed in an edit window, as in Figure 7-5.
If there is no edit window on the screen, you will be prompted to create a window. As
before, hold the leff mouse button down, move the mouse until it form s a rectangle of an acceptable size and shape, then release the button. Your function definition will
automatically appear in this edit window.

Figure 7-5. An Edit Window
Many changes are easily done with the structure editor. Notice that by pressing the left mouse button you can place the caret in position, and by pressing the middle mouse
button you can select atoms or s-expressions. Repeated pressing of the middle button selects bigger pieces of text.
To add an expression that does not appear in the edit window (i.e., it cannot simply be underlined), place the caret at the insertion point and type it in.. For example, to
replace the first GREATER with LARGER, place the caret to the left of GREATER , as shown in Figure 7-6.
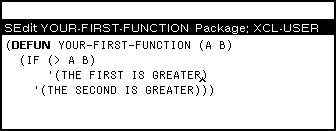
Figure 7-6. Caret Placement Prior to Changing GREATER with LARGER
Now press the DELETE key seven times, and type in LARGER . The window now looks like this:

Figure 7-7. GREATER Changed to LARGER
Notice the asterisk in the left edge of the title bar of the window. This designates that the function has be changed. Now exit the edit session by typing Control-X, and the function will be redifined.
Text can be marked as a comment by typing a semi-colon before the text of the comment.
; This is the form of a comment
Inside an editor window, the comment will be printed in a different font and may be moved to the far right of the code. SEdit is familiar with the Common Lisp convention of single comments being on the far right, double comments being justified with the
function level, and triple comments being on the far left, as is shown in Figure 7-8.
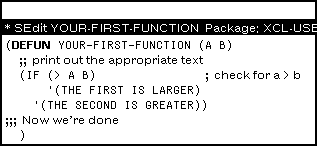
Figure 7-8. Placement of Comments
There are other editor commands which can be very useful. To learn about them, read Appendix B of the Release Notes.
With Medley, all work is done inside the Lisp environment. There is no operating system or command level other than the Executive Window. All functions and data
structures are defined and edited using normal Lisp commands. This sertion describes tools in the Medley environment that will keep track of any changes that you make in the environment that you have not yet saved on files, such as defining new functions,
changing the values of variables, or adding new variables. And it then has you save the changes in a file you specify. All of these functions are in the INTERLISP (IL:) package.
Certain system-defined global variables are used by the file package to keep track of the environment as it stands. You can get system information by checking the values of
these variables. Two important variables follow.
FILELST evaluates to a list, all files that yoU have loaded into the Medley environment.
filenameCOMS (Each file loaded into the Lisp environment has associated with it a global variable, whose name is formed by appending COMS to the end of the filename.) This variable evaluates to a list of all the functions, variables, bitmaps, windows, and soon, that are stored on that particular file.
For example, if you type:
MYFILECOMS
the system will respond with something like:
((FNS YOUR-FIRST-FUNCTION ) VARS))
The functions (FILES?) and (MAKEFILE ’filename) are useful when it is time to save function, variables, windows, bitmaps, records and whatever else to files.
(FILES?) displays a list of variables that have values and are not already a part of any file, and then the functions that are not already part of any file.
Type:
the system will respond with something like:
the variables: MY.VARIABLE CURRENT.TURTLE...to be dumped
the functions: RIGHT LEFT FORWARD BACKWARD CLEAR-SCREEN...to be dumped
want to say where the above go?
If you type Y, the system will prompt with each item. There are three options:
To save the item, type the filename (unquoted) of the file where the item should be placed. (This can be a brand new file or an existing file.)
To skip the item, without removing it from consideration the next
time (FILES?) is called, type crø This will allow you to postpone the decision about where to save the item.
If the item should not be saved at all, type ]. Nowhere will appear after the item.
Part of an example interaction is shown in the following figure:

Figure 7-9. Part of an interaction using the function FILES?
(FILES?) assembles the items by adding them to the appropriate file’s
COMS variable (see the File Variables section above). (FILES?) does NOT write the file to secondary storage (disks or floppies). It only
upclates the global variables discussed in the File Variables section above.
(MAKEFILE ’filename)
actually writes the file to secondary storage. Type:
and the system will create the file. The function returns the full name of the file created. (i.e. {DSK}MY.FlLE.NAME.; 1 ).
Files written to (DSK) are permanent files. They can be removed only by the user deleting them or by reformatting the disk.
Other file manipulation functions can be foun d in Chapter 4.
![]()
Lisp has a number of global variables that control the environment. Global variables make it easy to customize the environment to fit your needs. One way to do this is to
develop an INIT file. This is a file that is loaded when you start an image. You can use it to set variables, load files, define functions, and any other things that you want to do to make the Medley environment suit you.
As described in File Variables section of Chapter 11, each program file has a global Your INIT file could be called INIT, INIT.LISP, INIT.USER, or whatever the
convention is at your site. There is no default name preferred by the system, it just
looks for the files listed in the variable USERGREETFILES (see below). Check to see what the preference is at your site. Put this file in your directory. Your directory name should be the same as your login name. The INIT file is loaded by the function GREET. GREET is normally run when Medley is started. If this is not the case at your site, or you want
to use the machine and Medley has already been started, you can run the function
GREET yourself. If your user name was, for example, TURING , then you would type:
(GREET ’TURING)
This does a number of things, including undoing any previous greeting operation,
loading the site init file, and loading your init file. Where GREET looks for your INIT file depends on the value of the variable USERGREETFILES. The value of this variable is set when the system’s SYSOUT file is made, so check its value at your site! For example, its value could be:
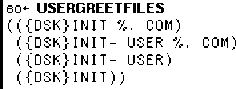
Figure 8-1. Possible Value of USERGREETFILES
In each place you see >USER>, the argument passed to GREET is substituted into the path. This is your login name if you are just starting Medley. For example, the first value in the list would have the system check to see whether there was a
{DSK}<LISPFlLES>TURING>INIT.LISP file. No error is generated if you do not have an INIT file, and none of the files in USERGREETFILES are foun d.
As described in File Variables section of Chapter 11, each program file has a global
variable associated with it, whose name is formed by appending COMS to the end of the root filename. For any of the standard INIT file names, the variable INITCOMS is used. To set up an init file, begin by editing this variable. Type:
(DV INITCOMS)
8. YOUR INIT FILE
An SEdit window wiil appear. This window is the same as the one called with the
function DF, and described in the Using the List Structure Editor section in Chapter 7. This chapter assumes that you know how to use the SEdit structure editor .
The COMS variable is a list of lists. The first atom in each internal list specifies for the file package what types of items are in the list, and what it is to do with them. This
section will deal with three types of lists: VARS, FILES, and P. Please read about others in Chapter 17 of the IRM.
Notice that inside the vars list, there is yet another list. The first item in the list is the name of the variable. It is bound to the value of the second item. There are many other variables that you can set by adding them to the VARS list. Some of these variables are described in Chapter 24, and many others can be foun d in the IRM.
If you want to automatically load files, that can be done in your init file also. For
example, if you always want to load tho Library file SPY.LCOM , you can load it by editing tho INITCOMS variable to list the appropriate file in the list starting with FILES:
.
.
.
(FILES SPY)
.
.
.
Figure 8-2. INITCOMS Changed to Load SPY.LCOM File
Other files can also be added by simply adding their names to this FILES list.
Another list that can appear in a COMS list begins with P. This list contains Lisp
expressions that are evaluated when the file is loaded. Do not put DEFINEQ expressions in this list. Define the function in the environment, and then save it on the file in the
usual way (see Chapter 7).
One type of expression you might want to see here, however, is a FONTCREATE function (see Chapter 16). For example, of you want to use a Helvetica 12 BOLD font, and there is not a font descriptor for it normally in your environment, the appropriate call to FONTCREATE should be in the "P" list. The INITCOMS would look like this:
.
.
.
(FILES SPY)
(P (FONTCREATE ’HELVETICA 12 ’BOLD))
.
.
.
Figure 8-3. INITCOMS Edited to Include a call to FONTCREATE
To quit, exit from SEdit in the usual way. When you run the function MAKEFILES (see Chapter 7), be sure that you are connected to the directory (see Chapter 4) where the INIT file should appear. Now when GREET is run, your Init file will be loaded.
![]()
8-2 Medley for the Novice, Release 2.0
![]()
DWIM (Do What I Mean) is an Interlisp utility that makes life easier.
DWIM tries to match unrecognized variable and function names to known ones. This allows Lisp to interpret minor typing errors or misspellings in a function, without
causing a break. Line 152 of Figure 9-1 illustrates how the misspelled BANNANNA was replaced by BANANA before the expression was evaluated.

Figure 9-1. Examples of DWIM Features
Sometimes DWIM may alter an expression you didn’t want it to. This may occur if, for
example, a hyphenated function name (e.g., (MY-FUNCTION) ) is misused. If the system does not recognize the function name, it may think you are trying to subtract "FUNCTION" from "MY". DWIM also takes the liberty of updating the function, so it will
have to be fixed. However, this is as much a blessing as a curse, since it points out the misused expression!
![]()
The Break Package is a part of Interlisp that makes debugging your programs much easier.
A break is a function either called by the programmer or by the system when an error has occurred. A separate window opens for each break. This window works much like the Executive Window, except for extra menus unique to a break window. Inside a
break window, you can examine variables, look at the call stack at the time of the
break, or call the editor. Each successive break opens a new window, where you can execute functions without disturbing the original system stack. These windows
disappear when you resolve the break and return to a higher level.
This example illustrates the basic break package functions. A more complete explanation of the breaking functions, and the break package will follow.
The correct definition of FACTORIAL is:
(defun factorial (x) (if (zerop x)
1
(* x (factorial (1- x)))))
To demonstrate the break package, we have edited in an error: DUMMY in the IF statement is an unbound atom, it lacks a value.
((defun factorial (x) (if (zerop x)
dummy
(* x (factorial (1- x)))))
The evaluated function
(FACTORIAL 4)
should return 24, but the above function has an error. DUMMY is an unbound atom, an atom without an assigned value, so Lisp will "break". A break window appears (Figure 10-1), that has all the functionality of the typing lisp expressions into the Executive
Window (The top level), in addition to the break menu functions. Each consecutive break will move to another level "down".

Figure 10-1. Break Window
Move the mouse cursor into the break window and hold down the middle mouse button.
The Break Menu will appear. Choose BT. Another menu, called the stack menu, will appear beside the break window. Choosing stack items from this menu will display
another window. This window displays the function’s local variable bindings, or values (see Figure 10-2). This new window, titled FACTORlAL Frame, is an inspector window (see inspector Chapter 17).
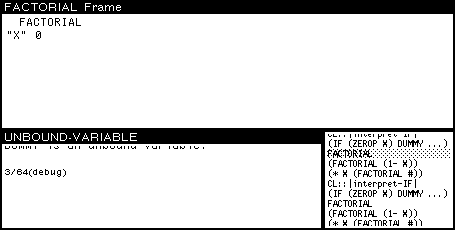
Figure 10-2. Back Trace of the System Stack
From the break window, you can call the editor for the function FACTORIAL by middle- buttoning on the word FACTORIAL and selecting DisplayEdit from the menu that pops up.
Replace the unbound atom DUMMY with 1. Exit the editor .
The function is fixed, and you can restart it from the last call on the stack. (It does not have to be started again from the Top Level.) To begin again from the last call on the stack, choose the last (top) FACTORIAL call in the BT menu. Select REVERT from the middle button break window, or type it into the window. The break window will close, and a new one will appear with the message: Breakpoint at FACTORIAL
To start execution with this last call to FACTORIAL , choose OK from the middle button break menu. The break window will disappear, and the correct answer, 24, will be
returned to the top level.
BREAKPACKAGE
![]()
There are ways you can stop execution from the keyboard. They differ in terms of how much of the current operating state is saved:
Control-G Provides you with a menu of processes to interrupt. Your process will
usually be "EXEC". Choose it to break your process. A break window will then appear.
Control-B Causes your function to break, saves the stack, then displays a break window with all the usual break functions. For information on other interrupt characcers, see Chapter 30 in the IRM.
Move the mouse cursor into the break window. Hold the middle button down, and a new menu will pop up, like the one in Figure 10-3.

Figure 10-3. Middle Button Menu in Break window
Five of the selections are particularly important when just starting to use Medley:
BT Back Trace displays the stack in a menu beside the break window. Back
Trace is a very powerful debugging tool. Each function call is placed on the
stack and removed when the execution of that function is complete. Choosing an item on the stack will open another window displaying that item’s local
variables and their bindings. This is an inspector window that offers all the power of the inspector. (For details, see the section on the Inspector, Chapter 17.)
? = Before you use this menu option, display the stack by choosing BT from this menu, and choose a function from it. Now, choose ?=. It will display the
current values of the arguments to the function that has been chosen from the stack.
Move back to the previous break window, or if there is no other break window, back to the top level, the Executive Window.
REVERT Move the point of execution back to a specified function call before the error. The function to revert back to is, by default, the last function call before the break. If, however, a different function call is chosen on the BT menu, revert will go back to the start of this function and open a new break window. The
items on the stack above the new starting place will no longer exist. This is used in the tutorial example (see the Break Package Example section above).
OK Continue execution from the point of the break. This is useful if you have a simple error, i.e., an unbound variable or a nonnumeric argument to an
arithmetic function. Reset the variable in the break window, then select OK. (see the Break Package Example section above).
In addition to being available on the middle button menu of the break window, all of these functions can be typed directly into the window. Only BT behaves differently
when typed. It types the stack into the trace window instead of opening a new window.)
Typing Control-D will immediately take you to the top level from any break window.
The functions called before the break will stop, but any side effect s of the function that occurred before the break remain. For example, if a function set a global variable before it broke, the variable will still be set after typing Control-D.
![]()
The purpose of this chapter is to explain what to do in some of the problems commonly experienced by Medley users.
An example is shown in Figure 11-1.
Press any key to unfreeze the window and continue. This pause happens when the command you just typed causes enough information to be printed to fill the window. It gives you a chance to read that one window of text before moving on.

Figure 11-1. Blackened Executive Window
Open another from the Background Menu.
Type (CURSOR T) in the Executive Window. The cursor will reappear.
This probably happens because you made a typing mistake, as in Figure 11-2.

Figure 11-2. Second Window Appears (Break Window) after Typing Error Made
Type a Control-D by simultaneously pressing the Control key and the "D". This aborts the error condition, returning control to the Executive Window.
Usually the beeping means that Medley want input from you. Look for the flashing
caret. It will usually be preceeded by some kind of prompt, indicating what you should type.
of the filename you are typing to (FILES?) . Type Control-E (error) You will get a linefeed and printed to the window. Now type the correct filename.
It is not returning a value, and you think that your program may be in an infinite loop or is having some other major problem. You can see what process is currently running by typing Control-T, or you could interrupt the process by typing Control-E.
If the Break Window look something like that shown in Figure 11-3, you are trying to save a file, but there is not enough space on the hard disk.

Figure 11-3. Break Window Caused by Insufficient Space in Save File
Exit from the Break Window by typing an up arrow followed by a Return. Delete old versions of files, and any other files you do not need. Then try again to save the file
Generally, a Break Window has appeared. The GAINSPACE function allows you to delete non-essential data structures. To use it, type:
into the Executive Window. Answer N to all questions except the following:
Delete edit history
Delete history list
Delete values of old variables
Delete your MASTERSCOPE database
Delete information for undoing your greeting. Save your work and reload Lisp as soon as possible.
The message (Some.Crucial.Function.Or.Variable redefined) appears in the
Executive Window (see Figure 11-4). The function, variable, or other property has been "smashed" (i.e., its original definition has been changed). If this is not what you
wanted, type UNDO immediately!
WHAT TO DO IF...
![]()

Figure 11-4. CAR redefined!
If this occurs, you probably just typed something wrong, or you passed an argument that should have been quoted to a function.
First, look at what caused the error. If the CAR of the form is a list, then you typed something wrong. If it is an atom, then perhaps that atom does not have a function associated with it. If it is a CLISP word like if or for, then DWIM may have been
turned off (see Chapter 9). Type (DWIM ’C) to reenable DWIM.
and your screen is spewing out information about everything going on in the
environment. Type Control E, and type (UNBREAK ’APPLY) before reeturning to the Executive.
[This page intentionally left blank]
![]()
Windows have two basic parts: an area on the screen containing a collection of pixels,
and a property list. The window properties determine how the window looks, the menus that can be accessed from it, what should happen when the mouse is inside the window and a mouse button is pressed, and soon.
Some of the window’s properties can be specified when a window is created with the function CREATEW. In particular, it is easy to specify the size and position of the
window; its title; and the width of its borders.
(CREATEW region title borderw’idth)
Region is a record (named REGION , with the fields left, bottom , width, and height) or a list. A region describes a rectangular area on the screen, the window’s dimensions and position. The fields left and bottom refer to the position of the bottom leff corner of
the region on the screen. Wi dth and height refer to the width and height of the region. The usable space inside the window will be smaller than the width and height, because some of the window’s region is consumed by the title bar, and some is taken by the
borders.
Title is a string that will be placed in the title bar of the window.
Borderwidth is the width of the border around the exterior of the window, in number of pixels.
For example, typing:
(SETQ MY.WINDOW (CREATEW (CREATEREGION l00 150 300 200) "THIS IS MY OWN WINDOW")
or
(SETQ MY.WINDOW (CREATEW
(CREATEW ’(100 150 300 200) "THIS IS MY OWN WINDOW")
produces a window with a default borderwidth. Note that you did not need to specify all the window’s properties (see Figure 12-1).

Figure 12-1. Creating a Window
In fact, if (CREATEW) is called without specifying a region, you will be prompted to sweep out a region for the window (see Chapter 10)
The function to access or add to any property of a window’s property list is
WINDOWPROP.
(WINDOWPROP window property <value>)
When you use WINDOWPROP with only two arguments—window and property—it
returns the value of the window’s property. When you use WINDOWPROP with all three
arguments—window, property and value—it sets the value the window’s property to the value you inserted for the third argument.
For example, consider the window, MY WINDOW , created using (CREATEW). TITLE and
REGION are both properties. Type
(WINDOWPROP MY.WINDOW ’TITLE)
and the value of MY.WlNDOW’s TITLE property is returned, "THIS 1S MY OWN WINDOW". To change the title, use the WINDOWPROP function, and give it the window, the property title, and the new title of the window.
(WINDOWPROP MY.WINDOW ’TITLE "MY FIRST WINDOW")
automatically changes the title and automatically updates the window. Now the window looks like Figure 12-2.

Figure 12-2. TITLE is a Window Property
Altering the region of the window, MY.WINDOW, is also be done with WINDOWPROP, in the same way you changed the title. (Changing either of the first two numbers of a region
changes the position of the window on the screen. Changing either of the last two numbers changes the dimensions of the window itself.)
Four basic window properties will be discussed here: CURSORINFN , CURSOROUTFN, CURSORMOVEDFN, and BUTTONEVENTFN.
A function can be stored as the value of the CURSORlNFN property of a window. It is called when the mouse cursor is moved into that window.
Look at the following example:
First, create a window called MY.WINDOW. Type:
(SETQ MY.WINDQW
(CREATEW
(CREATEREGION 200 200 200 200) "THIS WINDOW WILL SCREAM!"))
This creates a window.
Now define the function SCREAME R. It will be stored on the property CURSOR1NFN . (Notice that this function has one argument, WlNDOWNAM E. All functions called from the property CURSOR1NFN are passed the window it was called from. So the value of MY.WINDOW is bound to WINDOWNAME. When it is called, SCREAMER simply rings
bells.
(DEFINEQ (SCREAMER (WINDOWNAME) (RINGBELLS)
(PROMPTPRINT "YAY - IT WORKS!") (RINGBELLS)))
Now, alter that window’s CURSORINFN property, so that the system calls the function SCREAMER at the appropriate time. Type:
(WINDOWPROP MY.WINDOW ’CURSORINFN (FUNCTION SCREAMER))
After this, when you move the mouse cursor into MY.WlNDOW , the CURSORINFN
property’s function is called, and it rings bells twice.
CURSORINFN is one of the many window properties that come with each window - just as REGION and TITLE did. Other properties include:
CURSOROUTFN The function that is the value of this property is executed when the cursor is moved out of a window.
CURSORMOVEDFN The function that is the value of this property is executed when the cursor is moved while it is inside the window.
BUTTONEVENTFN The function that is the value of this property is executed when either the left or middle mouse buttons are pressed (or released).
Figure 12-3 shows MY.WlNDOW’s properties. Notice that the CURSORINFN has the
function SCREAMER stored in it. The properties were shown in this window using the function INSPECT. INSPECT is covered in Chapter 17.
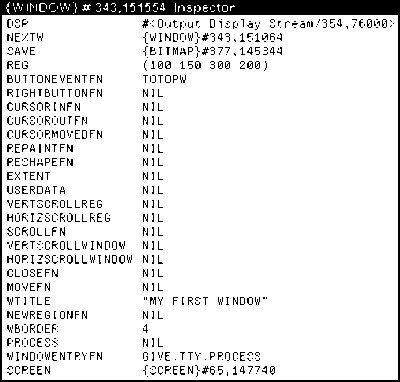
Figure 12-3. Inspecting MY.WINDOW for Mouse-Related Window Properties
You can define functions for the values of the properties CURSOROUTFN and CURSORMOVEDFN in much the same way as you did for CURSORINFN. The function that is the value of the property BUTTONEVENTF N, however, can be specialized to respond in different ways, depending on which mouse button is pressed. This is explained in the
next section.
BUTTONEVENTFN is another property of a window. The function that is stored as the value of this property is called when tho mouse is inside the window, and a mouse button is pressed. As an example of how to use it, type:
(WINDOWPROP MY.WINDOW ’BUTTONEVENTFN (FUNCTION SCREAMER))
When the mouse cursor is moved into the window, bells will ring because of the CURS0RlNFN, but it will also ring bells when either the left or middle mouse button is pressed. Notice that the right mouse button functions as it usually does, with the
window manipulation menu. If only the left button should evoke the function SCREAMER, then the function can be written to do just this, using the function MOUSESTATE, and a form that only MOUSESTATE understands, ONLY. For example:
(DEFINEQ
(SCREAMER2 (WINDOWNAME)
(if (MOUSESTATE (ONLY LEFT)) then (RINGBELLS))))
In addition to (ONLY LEFT), MOUSESTATE can also be passed (ONLY MIDDLE) , (ONLY RIGHT) or combinations of these (e.g. (OR (ONLY LEFT) (ONLY MIDDLE))). You do not need to use ONLY with MOUSESTATE for every application. ONLY means that that
button is pressed and no other.
If you do write a function using (ONLY RIGHT), be sure that your function also checks position of the mouse cursor. Even if you want your function to be executed when the mouse cursor is inside the window and the right button is pressed, there is a convention that the function DOWINDOWCOM should be executed when the mouse cursor is in the
title bar or the border of the window and the right mouse button is pressed. Please
program your windows using this tradition! For more information, please see Chapter 28 in the IRM.
INSPECT is a function that displays a list of the properties of a window, and their values. Figure 12.3 shows the INSPECT function run with MY.WINDOW . Note the
properties introduced in CREATEW : WBORDER is the window’s border, REG is the region, and WTITLE is the window’s title.
A region is a record, with the fields LEFT, BOTTOM , WIDTH, and HEIGHT. LEFT and BOTTOM refer to where the bottom left hand corner of the region is positioned on the screen. WIDTH and HEIGHT refer to the width and height of the region.
CREATEREGION creates an instance of a record of type REGION . Type:
(SETQ MY.REGION (CREATEREGION 15 l00 200 450))
to create a record of type REGION that denotes a rectangle 200 pixels high, and 450 pixels wide, whose bottom left corner is at position (15, 100). This record instance can be passed to any function that requires a region as an argument, such as CREATEW , above.
![]()
While Medley provides a number of menus of its own (see Chapter 3), this section
addresses the menus you wish to create. You will learn how to create a menu, display a menu, and define functions that make your menu useful. Menus are instances of
records (see Chapter 24). There are 27 fields that determine the composition of every menu. Because Medley provides default values for most of these descriptive fields, you need to familiarize yourself with only a few that we describe in this section.
Two of these fields, the TITLE of your menu, and the ITEMS you wish it to contain, can be typed into the executive window as shown below:
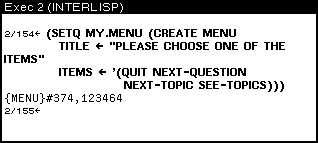
Figure 13-1. Creating a menu
Note that creating a menu does not display it. MY.MENU is set to an instance of a menu record that specifies how the menu will look, but the menu is not displayed.
Typing either the MENU or ADDNENU functions will display your menu on the screen. MENU implements pop-up menus, like the Background Menu or the Window Menu. ADDMENU puts menus into a semi-permanent window on the screen, and lets you select items from it.
(MENU MENU POSITION) pops up a menu at a particular position on the screen. Type:
(MENU MY.MENU NIL)
to position the menu at the end of the mouse cursor. Note that the POSITION argument is NIL. In order to go on, you must either choose an item, or move outside the menu
window and press a mouse button. When you do either, the menu will disappear. If you choose an item, then want to choose another, the menu must be redisplayed.
(ADDMENU menu window position) positions a permanent menu on the screen, or in an existing window.
Type:
(ADDMENU MY.MENU)
to display the menu as shown in Figure 13-2. This menu will remain active, (will stay on the screen) without stopping all the other processes. Because ADDMENU can display a menu without stopping all other processes, it is very popular in users programs.
If window is specified, the menu is displayed in that window. If window is not specified, a window the correct size for the menu is created, and the menu is displayed in that
window.
If position is not specified, the menu appears at the current position of the mouse cursor.

Figure 13-2. Simple MenuDisplayed with ADDMENU
One way to make a menu do things is to specify more about the menu items. Instead of items simply being the strings or atoms that will appear in the menu, items can be lists, each list with three elements (see Figure 13-3). The first element of each list is what
will appear in the menu; the second expression is what is evaluated, and the results of the evaluation returned, when the item is selected; and the third expression is the
expression that should be printed in the Prompt window when a mouse button is held down while the mouse is pointing to that menu item. This third item should be thought of as help text for the user. If the third element of the list is NIL, the system responds with Will select this item w hen you release the button.

Figure 13-3. Creating a Menu to do Things, then displaying it with the function
ADDMENU
Now when an item is selected from MY.MENU2, something will happen. When a mouse button is held down, the expression typed as the third element in the item’s
specification will be printed in the Prompt window. (See Figure 13-4.)

Figure 13-4. Mouse Button Held Down While Mouse Cursor SeIects NEXT.QUESTION
When the mouse button is released (i.e., the item is selected) the expression that was typed as the second element of the item’s specification will be run. (See Figure 13-5.)

Figure 13-5. NEXT-QUESTION Selected
Another way to get a menu to do things is to define functions, and make them the
values of the menu’s WHENHELDFN and WHENSELECTEDFN fields. As the value of the
WHENHELDFN field of a menu, the function you defined will be executed when you press
and hold a mouse button inside the menu. As the value of the WHENSELECTEDFN field of a menu, the function you defined will be executed when you choose a menu item. This
example has the same functionality as the previous example, where each menu item was entered as a list of three items.
As an example, type in these two functions so that they can be executed when the menu is created and displayed:
(DEFINEQ (MY.MENU3.WHENHELD (ITEM.SELECTED MENU.FROM BUTTON.PRESSED)
(SELECTQ ITEM.SELECTED
(QUIT (PROMPTPRINT "CHOOSE THIS TO STOP")
(NEXT-QUESTION (PROMPTPRINT "CHOOSE THIS TO BE ASKED THE NEXT QUESTION"))
(NEXT-TOPIC (PROMPTPRINT "CHOOSE THIS TO MOVE ON TO THE NEXT SUBJECT"))
(SEE-TOPICS (PROMPTPRINT "CHOOSE THIS TO SEE THE TOPICS NOT YET LEARNED"))
(ERROR (PROMPTPRINT "NO MATCH FOUND"))))
(DEFINEQ (MY.MENU3.WHENSELECTED (ITEM.SELECTED MENU.FROM BUTTON.PRESSED)
(SELECTQ ITEM.SELECTED
(QUIT (PRINT "STOPPED")
(NEXT-QUESTION (PRINT "HERE IS THE NEXT QUESTION")) (NEXT-TOPIC (PRINT "HERE IS THE NEXT SUBJECT")) (SEE-TOPICS (PRINT "THE FOLLOWING HAVE NOT BEEN
LEARNED . . ."))
(ERROR (PROMPTPRINT "NO MATCH FOUND"))))
Now, to create the menu, type:
(SETQ MY.MENU3 (CREATE MENU
TITLE "PLEASE CHOOSE ONE OF THE ITEMS"
ITEMS ’(QUIT NEXT-QUESTION NEXT-TOPIC SEE-TOPICS) WHENHELDFN (FUNCTION MY.MENU3.WHENHELD) WHENSELECTEDFN (FUNCTION MY.MENU3.WHENSELECTED)))
To see your menu work, type
(ADDMENU MY.MENU3)
Now, due to executing the WHENHELDFN function, holding down any mouse button while pointing to a menu item will display an explanation of the item in the prompt window.
The screen will once again look like Figure 13-4 when the mouse button is held when the mouse cursor is pointing to the item NEXT-TOPIC .
Now due to executing the WHENSELECTEDFN function, releasing the mouse button to select an item will cause the proper actions for that item to be taken. The screen will once again look like Figure 13-5 when the item NEXT-TOPIC is selected. The crucial
thing to note is that the functions you defined for WHENHELDFN and WHENSELECTEDFN
are automatically given the following arguments:
The item that was sølected, ITEM.SELECTED
The menu it was selected from, MENU.FROM
The mousø button that was pressed BUTTON PRESSED
These functions, MY.MENU3.WHENHELD and MY.MENU3.WHENSELECTED, were quoted
using FUNCTION instead of QUOTE both for program readability and so that the compiler can produce faster code when the program is compiled. It is good style to quote
functions in Lisp by using the function FUNCTION instead of QUOTE.
INSPECT is a function that displays a list of the fields of a menu, and their values. Figure 13-6 shows the various fields of MY.MENU3 when the function (INSPECT
MY.MENU3) was called. Notice the values that were assigned by the examples, and all the defaults.
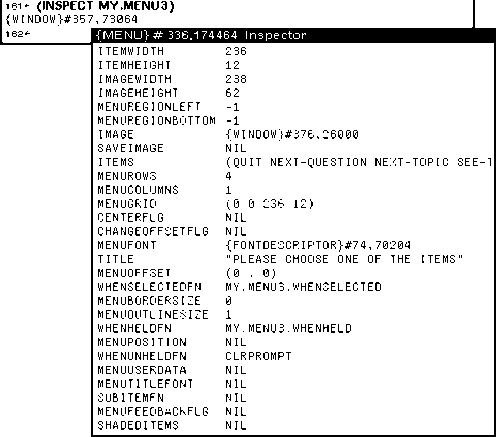
Figure 13-6. MY.MENU3 Fields
![]()
A bitmap is a rectangular array of dots. The dots are called "pixels" (for picture
elements). Each dot, or pixel, is represented by a single bit. When a pixel or bit is turned on (i.e. that bit set to 1), a black dot is inserted into a bitmap. If you have a bitmap of a floppy on your screen (Figure 14-1), then all of the bits in the area that make up the floppy are turned on, and the surrounding bits are turned off.

Figure 14-1. Bitmap of a Floppy
BITMAPCREATE creates a bitmap, even though it can’t be seen.
(BITMAPCREATE width height)
If the width and height are not supplied, the system will prompt you for them.
EDITBM edits the bitmap. The syntax of the function is:
(EDITBM bitmapname)
Try the following to produce the results in Figure 14-4:
(SETQ MY.BITMAP (BITMAPCREATE 60 40)) EDITBM MY.BITMAP)
To dra w In the bitmap, move the mouse into the gridded section of the bitmap editor, and press and hold the leff mouse button. Move the mouse around to turn on the bits
represented by the spaces in the grid. Notice that each space in the grid represents one pixel on the bitmap
To erase Move the mouse into the gridded section of the bitmap editor, and press and hold the center mouse button. Move the mouse around to turn off the bits represented by the spaces in the gridded section of the bitmap editor.
To w ork on a different section Point with the mouse cursor to the picture of the
actual bitmap (the upper left corner of the bitmap editor). Press and hold the left mouse button. A menu with the single item, Move will appear. (See Figure 14-2.) Choose this
item.
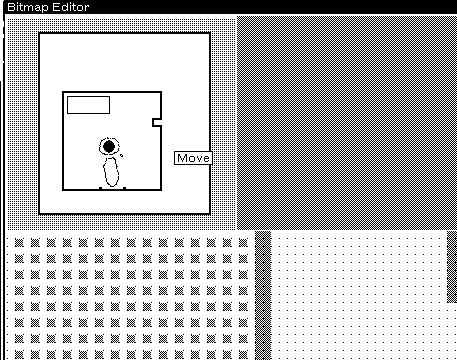
Figure 14-2. Menu with Single Item (Move)
You will be asked to position a ghost window over the bitmap. This ghost window
represents the portion of the bitmap that you are currently editing. Place it over the
section of the bitmap that you wish to edit and click the left mouse button (see Figure 14-3).
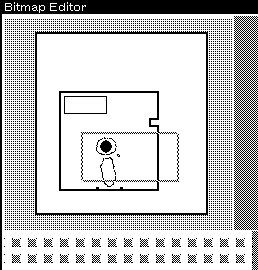
Figure 14-3. Ghost Window Awaiting Positioning
To end the session, bring the mouse cursor into the upper-right portion of the window (the grey area) and press the center button. Select OK from the menu to save your
artwork.
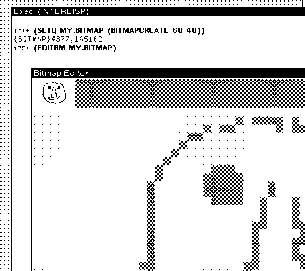
Figure 14-4. Editing a Bitmap
BITBLT is the primitive function for moving bits (or pixels) from one bitmap to another.
It extracts bits from the source bitmap, and combines them in appropriate ways with those of the destination bitmap. The syntax of the function is:
(BITBLT sourcebitmap sourcelefl sourcebottom destinationbitmap destinationleft destinationbottom width height sourcetype operation texture clippIngregion)
Here’s how it’s done —using MY.BITMAP as the sourcebitmap and MY.WlNDOW as the destinationbitmap.
(BITBLT MY.BITMAP NIL NIL
MY.WINDOW NIL NIL NIL NIL ‘INPUT ‘REPLACE)
Note that the destination bitmap can be, and usually is, a window. Actually, it is the bitmap of a window, but the system handles that detail for you. Because of the NILs
(meaning "use the default"), MY.BITMAP will be BITBLT’d into the lower right corner of
MY.WlNDOW (see Figure 14-5).

Figure 14-5. BITBLT ing a Bitmap onto a Window Here is what each of the BITBLT arguments to the function mean:
sourcebitmap The bitmap to be moved into the destinationbitmap
sourceleft A number, starting at 0 for the left edge of the
sourcebitmap, that tells BITBLT where to start moving pixels from the sourcebitmap. For example, if the leftmost 10 pixels of sourcebitmap were not to be moved, sourceleft should be 10. The default value is 0.
sourcebottom A number, starting at 0 for the bottom edge of the
sourcebitmap, that tells BITBLT where to start moving pixels from the sourcebitmap. For example, if the bottom 10 rows of pixels of sourcebitmap were not to be moved, sourcebottom should be 10 The default value is 0.
destinationbitmap The bitmap that will receive the sourcebitmap. This is
often a window (actually the bitmap of a window, but Interlisp-D takes care of that for you).
destinationleft A number, starting at 0 for the left edge of the
destinationbitmap, that tells BITBLT where to start placing pixels from the sourcebitmap. For example, to place the
sourcebitmap 10 pixels in from the left, destinationleft should be 10. The default value is 0.
destinationbottom A number, starting at 0 for the bottom edge of the
destinationbitmap, that tells BITBLT where to start placing pixels from the sourcebitmap. For example, to place the
sourcebitmap 10 pixels up from the bottom,
destinationbottom should be 10. The default value is 0.
width How many pixels in each row of sourcebitmap should be moved. The samc amount of space is used in
destinationbitmap to receive the sourcebitmap. If this
argument is NIL, it defaults to the number of pixels from sourceleft to the end of the row of sourcebitmap.
height How many rows of pixels of sourcebitmap should be moved.
The same amount of space is used in destinationbitmap to receive the sourcebitmap. If this argument is NIL, it
defaults to the number of rows from sourcebottom to the top of the sourcebitmap.
sourcetype Refers to one of three ways to convert the sourcebitmap for
writing. For now, just use ’INPUT.
operation Refers to how the sourtebitmap gets BITBLT ’d on to the destinationbitmap. ’REPLACE will BLT the exact
sourcebitmap. Other operations allow you to AND, OR or XOR the bits from the sourcebitmap onto the bits on the destinationbitmap.
texture J ust use NIL for now.
clippingregion J ust use NIL for now.
For more information on these operations, see Chapter 27 in the IRM.
![]()
A displaystream is a genera Jized "place to display". They determine exactly what is displayed where. One example of a displaystream is a window. Windows are the only
displaystreams that will be used in this chapter. If you want to draw on a bitmap that is not a window, other than with BITBLT, or want to use other types of displaystreams, please refer to Chapter 27 in the IRM.
This chapter explains functions for drawing on displaystreams: DRAWLINE , DRAWTO, DRAWCIRCLE., and FILLCIRCLE. In addition, functions for locating and changIng your curreAt position in the displaystream are covered: DSPXPOSITION , DSPYPOSITION, and MOVETO.
The examples belowshow you how the functions for drawing on a display stream work. First, create a window. Windows are displaystreams, and the one you create are used for the examples in this chapter. Type:
(SETQ EXAMPLE.WINDOW (CREATEW))
DRAWLINE draws a line in a displaystream. For example, type:
(DRAWLINE 10 15 100 150 5 ’INVERT EXAMPLE.WINDOW)
The results should look like Figure 15-1:

Figure 15-1. Line Drawn onto the EXAMPLE.WINDOW Displayrtream The syntax of DRAWLINE is
(DRAWLINE x1 y1 x2 y2 width operation stream color dashing)
The coordinates of the left bottom corner of the displaystream are 0 0.
xl and yl x and y coordinates of the beginning of the line x2andy2 ending coordinates of the line
width width of the line, in pixels
operation way the line is to be drawn. INVERT causes the line to invert the bits that are already in the displaystream. Drawing a line the second time using INVERT erases the line. For other operations, see Chapter 27 in the IRM.
stream displaystream. In this case, you used a window.
DRAWTO draws a line that begins at your current position in the displaystream. For example, type:
(DRAWTO 120 135 5 ’INVERT EXAMPLE.WINDOW)
The results should look like Figure 15-2:

Figure 15-2. Another Line drawn onto the EXAMPLE.WINDOW Displaystream The syntax of DRAWTO is
(DRAWTO x y width operation stream color dashing)
The line begins at the current position in the displaystream. x x coordinate of the end of the line
y y coordinate of the end of the line
width width of the line
operation way the lino is to be drawn. INVERT causes the line to invert the bits that aro already in tho displaystream. Drawing a line the second time using INVERT erases the line. For other operations, see Chapter 27 in the IRM
stream displaystreom. In this case. you used a window.
DRAWCIRCLE draws a circle on a displaystream. To use it, type:
(DRAWCIRCLE 150 100 30 ’(VERTICAL 5) NIL EXAMPLE.WINDOW)
Now your window, EXAMPLE.WlNDOW, should look like Figure 15-3:

Figure 15-3. Circle Drawn onto the EXAMPLE.WlNDOW Displaystream The syntax of DRAWCIRCLE is
(DRAWCIRCLE centerx centery radius brush dashing stream) centerx x coordinate of the center of the circle
centery coordinate of the center of the circle radius radius of the circle in pixels
brush list.- The first- item of the list is the shape of the brush. Some of your
options include ROUND, SQUARE, and VERTICAL. The second item of that list is the width of the brush in pixels.
dashing list of positive integers. The brush is "on" for the number of units
indicated by the first element of the list, "off" for the number of units
indicated by the second element of the list. The third element specifies how long it will be on again, and so forth. The sequence is repeated until the circle has been drawn.
stream displaystream. In this case, you used a window.
FILLCIRCLE draws a filled circle on a displaystream. To use it, type:
(FILLCIRCLE 200 150 10 GRAYSHADE EXAMPLE.WINDOW)
EXAMPLE.WlNDOW now looks like Figure 15-4:

Figure 15-4. A filled circle drawn onto the displaystream The syntax of FILLCIRCLE is:
(FILLCIRCLE centerx centery radius texture stream) centerx x coordinate of the center of the circle
centery y coordinate of the center of the ci rcle radius radius of the circle in pixels
texture shade that will be used to fill in the circle. Interlisp-D provides you with
three shades: WHlTESHADE , BLACKSHADE, and GRAYSHADE. You can also create your own shades. For more information on how to do this, see
Chapter 27 in the IRM.
stream displaystream. In this case, you used a window
There are many other functions for drawing on a displaystream. Please refer to Chapter 27 in the IRM.
Text can also be placed into displaystreams. To do this, use printing functions such as PRIN1 and PRIN2, but supply the name of the displaystream as the "file" to print to. To place the text in the proper position in the displaystream, see the section below.
There are functions provided to locate, and to change your current position in a
displayitream. This can help you place text, and other images where you want them in
a displaystream. This primer will only discuss three of these. There are others, and they can be foun d in the Chapter 27 of the IRM.
DSPXPOSITION is a function that will either change the current x position in a
displaystream, or simply report it. To have the function report the current x position in
EXAMPLE.WlNDOW, type:
(DSPXPOSITION NIL EXAMPLE.WINDOW)
DSPXPOSITION expects two arguments. The first is the new x position. If this argument is NIL, the current position is not changed, merely reported. The second argument is
the displaystream.
DSPYPOSITION is an analogous function, but It changes or reports the current y
position in a displaystream. As with DSPXPOSlTlON , if the first argument is a number, the current y position will be changed to that position. If it is NIL, the current position is simply reported. To have the function report the current y position in EXAMPLE.WlNDOW, type:
(DSPYPOSITION NIL EXAMPLE.WlNDOW)
The function MOVETO always changes your position in the displaystream. It expects three arguments:
(MOVETO x y stream)
new x position in the display stream
new y position in the display stream
stream display stream. The examples so far have used a window
![]()
This chapter explains font s and font descriptors, what they are and how to use them, so that you can use functions requiring font descriptors
You have already been exposed to many font s in Medley. For example, when you use the structure editor, DEdit (see the Using the List Structure Editor section of Chapter 7), you noticed that the comments were printed in a smaller font than the code, and
that CLlSP words (see the CLISP section of Chapter 9) were printed in a darker font
than the other words in the function. These are only some of the font s that are available in Medley.
In addition to the font s that appear on your screen, Medley uses font s for printers that are different than the ones used for the screen. The font s used to print to the screen are called DlSPLAYFONTS. The font s used for prining are called INTERPRESSFONTS , or PRESSFONTS, depending on the type of printer.
Fonts are described by family, weight, slope, width, and size. This section discusses each of these, and describes how they affect the font you see on the screen.
Family is one way that font s can differ. Here are some examples of how "family" affect s the look of a font:
CLASSIC This family makes the word "Able" look like this: Able MODERN This family makes the word "Able" look like this: Able TITAN This family makes the word "Able" look like this: Able
Weight also determines the look of a font. Once again, "Able" will be used as an example, this time only with the Classic family. A font’s weight can be:
BOLD And look like this: Able
MEDIUM
or REGULAR And look like this: Able
The slope of a font is italic or regular. Using the Classic family font again, in a regular weight, the slope affect s the font like this:
ITALIC Looks like this: Able
REGULAR Looks like this: Able
The width of a font is called its "expansion". It can be COMPRESSED , REGULAR, or
EXPANDED.
Together, the weight, slope, and expansion of a font specifies the font’s "face". Specifically, the face of a font is a three element list:
(weight slope expansion)
To make it easier to type, when a function requires a font face as an argument, it can be abbreviated with a three-character atom. The first specifies the weight, the second the
slope, and the third character the expansion. For example, some common font faces are abbreviated:
MRR This is the usual face, MEDIUM, REGULAR, REGULAR
MIR Makes an italic font. It stands for: MEDIUM , ITALIC, REGULAR
BRR Makes a bold font. The abbreviation means: BOLD, REGULAR , REGULAR BIR Means that the font should be both bold and italic. BIR stands for BOLD,
ITALIC, REGULAR
The above examples are used so oflen, that there are also more mnemonic abbreviations for them. They can also be used to specify a font face for a function that requires a face as an argument. They are:
STANDARD This is the usual face: MEDIUM, REGULAR, REGULAR; it was abbreviated above, MRR
ITALIC This was abbreviated above as MIR, and specifies an italic font
BOLD Makes a bold font; it was abbreviated above, BRR
BOLDITALIC Makes a font both bold and italic: BOLD, ITALIC , REGULAR; it was abbreviated above, BIR
A font also has a size. It is a positive integer that specifies the height of the font in
printers points. A point is, on an 1108 screen, about 1/72 of an inch. On the screen of an 1186, a point is 1/80 of an inch. The size of the font used in this chapter is 10. For
comparison, here is an example of a TITAN, MRR, size 12 font: Able.
For Medley to use a font, it must have a font descriptor. A font descriptor is a data type in Interlisp-D that that holds all the information needed in order to use a particular font. When you print out a font descriptor, it looks like this:
{FONTDESCRIPTOR}#74,45540
Fontdescriptors are created by the function FONTCREATE . For example,
(FONTCREATE ’HELVETICA 12 ’BOLD)
creates a font descriptor that, when used by other functions, prints in HELVETICA BOLD size 12. Interlisp-D functions that work with font s expect a font descriptor produced
with the FONTCREATE function. The syntax of FONTCREATE is:
(FONTCREATE family size face)
Remember from the previous section, face is either a three element list (weight slope expansion), a three character atom abbreviation, e.g. MRR, or one of the mnemonic
abbreviations, e.g. STANDARD .
If FONTCREATE is asked to create a font descriptor that a J ready exists, the existing font descriptor is simply returned.
Display font s require files that contain the bitmaps used to print each character on the screen. All of these files have the extension .DlSPLAYFONT . The file name itself
describes the font style and size that uses its bitmaps. For example:
MODERN12.DISPLAYFONT
contains bitmaps for the font family MODERN in size 12 points. Wherever you put your
.DISPLAYFONT files, you should make this one of the values of the variable DISPLAYFONTDIRECTORIES. Its value is a list of directories to search for the bitmap files for display font s. Usually, it contains the "FONT" directory where you copied the bitmap files, and the current connected directory. The current connected directory is
specified by the atom NIL. When looking for a .DISPLAYFONT file, the system checks the FONT directory on the hard disk, then the current connected directory.
Figure 16-1 shows an example value of DISPLAYFONTDIRECTORIES :

Figure 16-1. Value for the Atom DISFLAYFONTDIRECTORIES
InterPress is the format that is used by Xerox laser printers. These printers normally have a resolution that is much higher than that of the screen: 300 points per inch.
To format files appropriately for output on such a printer, Interlisp must know the
actual size for each character that is to be printed. This is done through the use of width files that contain font width information for font s in InterPress format. For InterPress font s, you should make the location of these files one of the values of the variable INTERPRESSFONTDIRECTORIES. Its value is a list of directories to search for the font widths files for InterPress font s. Figure 16-2 is an example value of INTERPRESSFONTDIRECTORIES:
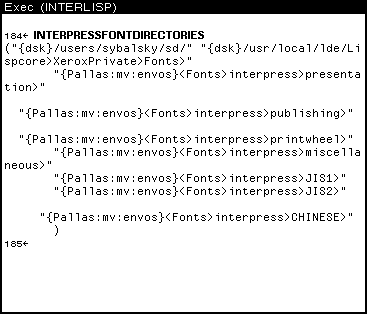
Figure 16-2. Value for Atom INTERPRESSFONTDIRECTORIES
It is possible to see the properties of a font descriptor. This s done with the function FONTPROP. For the following examples, the font descriptor used will be the one returned by the function (DEFAULTFONT ’DISPLAY) . In other words, the font descriptor
examined will be the default display font for the system.
There are many properties of a font that might be useful for you. Some of these are:
FAMILY To see the family of a font descriptor, type:
(FONTPROP (DEFAULTFONT ’DISPLAY) ’FAMILY)
SIZE As above, this is a positive integer that determines the height of the font in printer’s points. As an example, the SIZE of the current default font is:

Figure 16-3. Value of Font Property SIZE of Default Font
ASCENT The value of this property is a positive integer, the maximum height of
any character in the specified font from the baseline (bottom). The top of
the tallest character in the font, then, will be at (BASELINE + ASCENT
- l). For example, the ASCENT of the default font is:
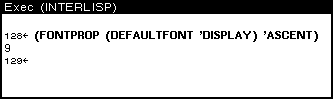
Figure 16-4. Value Font Property ASCENT of Default Font
DESCENT The DESCENT is an integer that specifies the maximum number of points that a character in the font descends below the baseline (e.g.,
letters such as "p" and "g" have tails that descend below the baseline.). The bottom of the lowest character in the font will be at (BASELINE - DESCENT). To see the DESCENT of the default font, type:
(FONTPROP (DEFAULTFONT ’DISPLAY) ’DESCENT) HEIGHT HEIGHT is equal to (DESCENT - ASCENT).
FACE The value of this property is a list of the form (weight slope expansion). These are the weight, slope, and expansion described above. You can see each one separately, also. Use the property that you are interested in, WEIGHT, SLOPE, or EXPANSION, instead of FACE as the second argument to FONTPROP.
For other font properties, see Chapter 27 of the IRM.
It is often useful to see how much space is required to print an expression in a particular font. The function STRINGWIDTH does this. For example, type:
(STRINGWIDTH "Hi there!" (FONTCREATE ’GACHA 10 ’STANDARD))
The number returned is how many left to right pixels would be needed if the string
were printed in this font. (Note that this doesn’t just work for pixels on the screen, but for all kinds of streams. For more information about streams, see Chapter 15.) Compare the number returned from the example call with the number returned when you change GACHA to TIMESROMAN.
The function DSPFONT changes the font in a single window. As an example of its use, first create a window to write in. Type:
(SETQ MY.FONT.WINDOW (CREATEW))
in the Executive Window. Sweep out the window. To print something in the default font, type:
(PRINT ’HELLO MY.FONT.WINDOW)
in the Executive Window. Your window, MY.FONT.WINDOW , will look something like Figure 16-5:

Figure 16-5. HELLO, Printed with the Default Font in MY.FONT.WINDOW
Now change the font in the window. Type:
(DSPFONT (FONTCREATE ’HELVETICA 12 ’BOLD) MY.FONT.WINDOW)
in the Executive Window. The arguments to FONTCREATE can be changed to create any desired font. Now retype the PRINT statement, and your window will look something
like Figure 16-6:

Flgure 16-6. Font in MY.FONT.WINDOW Changed Notice the font has been changed.
Medley keeps a list of default font specifications. This list is used to set the font in all windows where the font is not specifically set by the user (see the DSPFONT section
above). The value of the atom FONTPROFILE is this list (see Figure 16-7).
A FONTPROFILE is a list of font descriptions that certain system functions access when printing output. It contains specifications for big font s (used when pretty printing a
function to type the function name), small font s (used for printing comments in the editor), and various other font s.

Figure 16-7. Value of the Atom FONTPROFILE
The list is in the form of an association list. The font class names (e.g., DEFAULTFONT , or BOLDFONT) are the keywords of the association list. When a number follows the
keyword, it is the font number for that font class.
The lists following the font class name or number are the font specifications, in a form that the function FONTCREATE can use. The first font specification list affer a keyword
is the specification for printing to windows. The list(GACHA 10) in the figure above is an example of the default specification for the printing to windows. The last two font
specification lists are for Press and InterPress file printing, respectively. For more information, see Chapter 27 in the IRM.
Now, to change your default font settings, change the value of the variable FONTPROFILE. Medley has a list of profiles stored as the value of the atom FONTDEFS . Choose the profile to use, then install it as the default FONTPROFILE .
Evaluate the atom FONTDEFS and notice that each profile list begins with a keyword (see Figure 16-8). This keyword corresponds to the size of the font s included. BIG, SMALL, and STANDARD are some of the keywords for profiles on this list—SMALL and STANDARD appear in Figure 16-8.
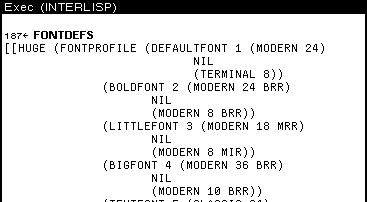
Figure 16-8. Part of Value of the Atom FONTDEFS
To install a new profile from this list, follow the following example, but insert any keyword for BIG.
To use the profile with the keyword BIG instead of the standard one, evaluate the following expression:
(FONTSET ’BIG))
Now the font s are permanently replaced. (That is, until another profile is installed.)
![]()
The Inspector is a window-oriented tool designed to examine data structures. Because Medley is such a powerful programming environment, many types of data structures would be difficult to see in any other way.
Take as an example an object defined through a sequence of pointers (i.e., a bitmap on the property list of a window on the property list of an atom inaprogram.)
To inspect an object named NAME, type:
(INSPECT ’NAME)
If NAME has many possible interpretations, an option menu will appear. For example, in Interlisp-D, a litatom can refer to both an atom and a function. For example, if NAME
was a record, had a function definition, and had properties on its property list, then the menu would appear as in Figure 17-1.

Figure 17-1. Option Window for Inspection of NAME
If NAME were a list, then the option menu shown in Figure 17.2 would appear. The options include:
Calling the display editor on the list
Calling the TTY editor (see Chapter 6)
Seeing the list’s elements in a display window. If you choose this option, each
element in the list will appear in the right column of the Inspector window. The left column of the Inspector window will be made up of numbers (see Figure 17-3).
Inspecting the list as a record type (this last option would produce a menu of known record types). If you choose a record type, the items in the list will appear in the
right column of the Inspector window. The left column of the Inspector window will be made up of the field names of the record.
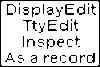
Figure 17-2. Option Window for Inspection of List
If you choose to display your data structure in an edit window, simply edit the structure and exit in the normal manner when done. If you choose to display the data structure in an inspect window, then follow these instructions:
To select an item, point the mouse cursor at it and press the left mouse button.
Items in the right column of an Inspector window can themselves be inspected. To do this, choose the item, and press the center mouse button.
Items in the right column of an Inspector window can be changed. To do this, choose the corresponding item in the left column, and press the center mouse button. You
will be prompted for the new value, and the item will be changed. The sequence of steps is shown in Figure 17-3.
The item in the lefl column is selected, and the middle mouse button pressed. Select the
SET option from the menu that pops up.
You will then be prompted for the new value. Type it in.
The item in the right column is updated to the value of what you typed in.


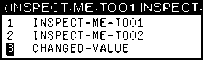
Figure 17-3. Steps Involved in Changing Value in Right Column of Inspector Window
This example will use ideas discussed in Chapter 21. An example, ANlMALGRAPH , is created in that section. You do not need to know the details of how it was created, but the structure is examined in this chapter.
If you type
(INSPECT ANIMAL.GRAPH)
and then choose the Inspect option from the menu, a display appears as shown in
Figure 17-4. ANlMAL.GRAPH is being inspected as a list. Note the numbers in the left column of the inspectorwindow.
THE INSPECTOR
![]()
Figure 17-4. Inspector Window For ANIMAL.GRAPH , Inspected as List If you choose the "As A Record" option, and choose "GRAPH" from the menu that
appears, the inspector window looks like Figure 17-5. Note the fieldnames in the left column of the inspector window.

Figure 17-5. Inspector Window for ANlMAL.GRAPH , Inspected as Instance of GRAPH
Record
The remaining examples will use ANlMAL.GRAPH inspected as a list. When the first item in the Inspector window is chosen with the leff mouse button, the Inspector
window looks like Figure 17-6.
Figure 17-6. Inspector Window for ANlMAL.GRAPH With First Element Selected
When you use the middle mouse button to inspect the selected list element, the display looks like Figure 17-7.

Figure 17-7. Inspector Window for ANlMAL.GRAPH and for First Element of
ANIMAL.GRAPH
How you can see that six items make up the list, and you can further choose to inspect one of these items. Notice that this is also inspected as a list. As usual, it could also
have been inspected as a record.
Select item 5 - MAMMAL DOG CAT - with the left mouse button. Press the middle mouse button. Choose "Inspect" to inspect your choice as a list. The Inspector now displays the values of the structure that makes up MAMMAL DOG CAT . (See Figure 17-8.)
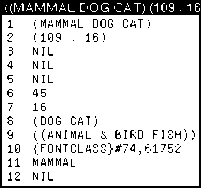
Figure 17-8. Inspector Window for Element S From Figure 17.7 That Begins ((MAMMAL DOG CAT).
![]()
Masterscope is a tool that allows you to quickly examine the structure of complex
programs. As your programs enlarge, you may forget what variables are global, what functions call other functions, and so forth. Masterscope keeps track of this for you.
To use Masterscope, first load MASTERSCOPE.DFASL and EXPORTS.ALL.
Suppose that JVTO is the name of a file that contains many of the functions involved in a complex system and that LINTRANS is the file containing the remaining functions. The first step is to ask Masterscope to analyze these files. These files must be loaded.
All Masterscope queries and commands begin with a period followed by a space, as in
. ANALYZE FNS ON MSCOPEDEMO
The ANALYZE process takes a while, so the system prints a period on the screen for each function it has analyzed. (See Figure 18-1)

Figure 18-1. Executive Window After Analyzing Files
If you are not quite sure what functions were just analyzed, type the file’s COMS variable (see the File Variables section in Chapter 7) into the Executive Window. The names of
the functions stored on the file will be a part of the value of this variable.
A variety of commands are now possible, all referring to individual functions within the analyzed files. Substantial variation in exact wording is permitted. Some commands
are:
. SHOW PATHS FROM ANY TO ANY
. EDIT WHERE ANY CALLS functionname
. EDIT WHERE ANY USES variablename
. WHO CALLS WHOM
. WHO CALLS functionname
. BY WHOM IS functionname CALLED
. WHO USES variablename AS FIELD
Note that the function is being called to invoke each command. Refer to the IRM for commands not listed here.
Figure 18-2 shows the Executive Window after the commands . WHO CALLS GobbleDump and . WHO DOES JVL inScan CALL.

Figure 18-2. Sample Masterscope Output
18. MASTERSCOPE
When the library package GRAPHER is loaded (to load this package, type (FILESLOAD GRAPHER)), Masterscope’s SHOWPATHS command is modified. The command will be
changed to generate a tree structure showi ng how the program’s functions interact instead of a tabular printout into the Executive window. For example, typing:
. SHOW PATHS FROM ProcessEND
produced the display shown in Figure 18-3.
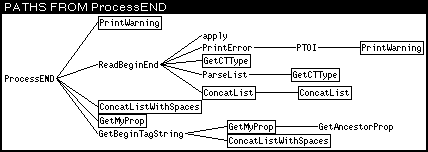
Figure 18-3. SHOW PATHS Display Example
All the functions in the display are part of this analyzed file or a previously analyzed file. Boxed functions indicate that the function name has been duplicated in another place on the display.
Selecting any function name on the display will pretty print the function in a window (see Figure 18-4).


Figure 18-4. Browser Printout Example
Selecting it again with the left mouse button will produce a desription of the function’s role in the overall system (see Figure 18-5).
MASTERSCOPE
![]()

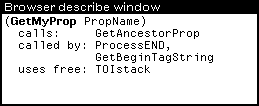
Figure 18-5. Browser Description Example
![]()
SPY is an Lisp library package that shows you where you spend your time when you run your system. It is easy to learn, and very useful when trying to make programs run
faster.
The function SPY.BUTTON brings up a small window which you will be prompted to position. Using the mouse buttons in this window controls the action of the SPY
program. When you are not using SPY, the window appears as in Figure 19.1.

Figure 19.1. SPY Window When SPY is Not Being Used
To use SPY, click either the left or middle mouse button with the mouse cursor in the
SPY window. The window will appear as in Figure 19.2, and means that SPY is accumulating data about your program.

Figure 19.2. SPY Window When SPY is Being Used
To turn off SPY after the program has run, again click a mouse button in the SPY
window. The eye closes, and you are asked to position another window. This window contains SPY’s results. An example of the resulting window is shown in Figure 19.3.
19. WHERE DOES ALL THE TIME GO? SPY
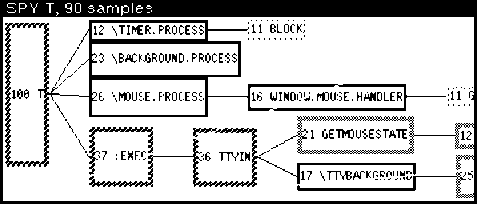
Figure 19.3. Window Produced After Running SPY
This window is scrollable horizontally and vertically. This is useful, since the whole tree does not fit in the window. If a part that you want to see is not shown, you can scroll the window to show the part you want to see.
SPY can also be run while a specific function or system is being used. To do this, type the function WITH.SPY:
(WITH.SPY form)
The expression used for form should be the call to begin running the function or system that SPY is to watch. If you watch the SPY window, the eye will blink! To see your
results, run the function SPY.TREE. To do this, type:
(SPY.TREE)
The results of the last running of SPY will be displayed. If you do this, and SPY.TREE returns (no SPY samples have been gathered), your function ran too fast for SPY to follow.
Each node in the tree is a box that contains, first, the percentage of time spent running that particular function, and second, the function name. There are two modes that can be used to display this tree.
The default mode is cumulative. In this mode, each percentage is the amount of time
that function spent on top of the stack, plus the amount of time spent by the functions it calls. The second mode is individual. To change the mode to individual, point to the title bar of the window, and press the middle mouse button. Choose Individual from the menu that appears. In this mode, the percentage shown is the amount of time the
function spent on the top of the stack.
To look at a single branch of the tree, point with the mouse cursor at one of the nodes of the tree, and press the right mouse button. From the menu that appears, choose the
![]()
19-2 Medley for the Novice, Release 2.0
19. WHERE DOES ALL THE TIME GO? SPY
option SubTree. Another SPY window will appear, with just this branch of the tree in it.
Another way to focu s within the tree is to remove branches from the tree. To do this, point to the node at the top of the branch you would like to delete. Press the middle mouse button, and choose Delete from the menu that appears.
There are also different amounts of "merging" of functions that can be done in the
window. A function can be called by another function more than once. The amount of merging determines where the subfunction, and the functions that it calls, appear in the tree, and how often. (For a detailed explanation of merging, see the Lisp Library Packages Manual.)
![]()
Free Menu is a library package that is even more flexible than the regular menu package. It allows you to create menus with different types of items in them, and
format s them as you require. Free menus are particularly useful when you want a "fill in the form" type interaction with the user.
Each menu item is described with a list of properties and values. The following example will give you an idea of the structure of the description list, and some of your options.
The most commonly used properties, and each type of menu item will be described in the Parts of a Free Menu Item and Types of Free Menu Items section below.
Free menus can be created and formatted automatically! It is done with the function
FM.FORMATMENU. This function takes one argument, a description of the menu. The
description is a list of lists; each internal list describes one row of the free menu. A free menu row can have more than one item in it, so there are really lists of lists of lists! It really isn’t hard, though, as you can see from the following example:
(SETQ ExampleMenu (FM.FORMATMENU
’(((TYPE TITLE LABEL TitlesDoNothing) TYPE 3STATE LABEL Example3State))
((TYPE EDITSTART LABEL PressToStartEditing
ITEMS (EDITEM)) (TYPE EDIT ID EDITEM LABEL ""))
(WINDOWPROPS TITLE "Example Does Nothing"))))
The first row has two items in it: one is a TITLE, and the second is a 3STATE item. The second row also has two items. The second, the EDIT item, is invisible, because its label is an empty string. The caret will appear for editing, however, if the EDITSTART item is chosen. Windowprops can appear as part of the description of the menu, because a
menu is, affer all, just a special window. You can specify not only the title with
WINDOWPROPS, but also the position of the free menu, using the "left" and "bottom"
properties, and the width of the border in pixels, with the "border" property. Evaluating this expression will return a window. You can see the menu by using the function OPENW. The following example illustrates this:
Figure 20.1. Example Free Menu
The next example shows you what the menu looks like after the EDITSTART item,
PressToStartEditing, has been chosen.
Figure 20.2. Free menu after EDITSTART Item Chosen
The following example shows the menu with the 3STATE item in its T state, with the item highlighted. (In the previous bitmaps, it was in its neutral state.)
.
Figure 20.3. Free menu with 3STATE Item in its T State
Finally, Figure 20.4 shows the 3STATE item in its NIL state, with a diagonal line through the item
Figure 20.4 Free menu with the 3STATE item in its NIL State
If you would like to specify the layout yourself, you can do that too. See the Lisp Library Packages Manual for more information.
There are eight different types of items that you can use in a free menu. No matter
what type, the menu item is easily described by a list of properties, and values. Some of the properties you will use most often are listed below:
LABEL Required for every type of menu item. It is the atom, string, or bitmap that appears as a menu selection.
TYPE One of eight types of menu items. Each of these are described in the section below.
MESSAGE The message that appears in the prompt window if a mouse button is held down over the item.
ID An item’s unique identifier. An ID is needed for certain types of menu items.
ITEMS Used to list a series of choices for an NCHOOSE item, and to list the ID’s of the editable items for an EDITSTART item.
SELECTEDFN The name of the function to be called if the item is chosen.
Each type of menu item is described in the following list, including an example description list for each one.
MOMENTARY This is the familiar sort of menu item. When it is selected, the
function stored with it is called. A description for the function that creates and format s the menu looks like this:
(TYPE MOMENTARY
LABEL Blink-N-Ring
MESSAGE "Blinks the screen and rings bells" SELECTEDFN RINGBELLS)
TOGGLE This menu item has two states, T and NIL. The default state is NIL, but choosing the item toggles its state. The following is an example description list, without code for the SELECTEDFN function, for this type of item:
(TYPE TOGGLE
LABEL DwimDisable SELECTEDFN ChangeDwimState)
FREE MENUS
![]()
3STATE This type of menu item has three states, NEUTRAL , T, and NIL. NEUTRAL is the default state. T is shown by highlighting the item, and NIL is shown with diagonal lines. The following is an example
description list, without code for the SELECTEDFN function, for this type of item:
(TYPE 3STATE
LABEL CorrectProgramAllOrNoSpelling SELECTEDFN ToggleSpellingCorrection)
TITLE This menu item appears on the menu as dummy text. It does nothing when chosen. An example of its description:
(TYPE TITLE LABEL "Choices:")
NWAY A group of items, nnly one of which can be chosen at a time. The items in the NWAY group should all have an ID field, and the ID’s
should be the same. For example, to set up a menu that would allow the user to choose between Helvetica, Gacha, Modern, and Classic font s, the descriptions might look like this (once again, without the code for the SELECTEDFN):
(TYPE NWAY ID FONTCHOICE
LABEL Helvetica SELECTEDFN ChangeFont)
(TYPE NWAY ID FONTCHOICE
LABEL Gacha
SELECTEDFN ChangeFont) (TYPE NWAY ID FONTCHOICE)
LABEL Modern SELECTEDFN ChangeFont)
(TYPE NWAY ID FONTCHOICE
LABEL Classic SELECTEDFN Changefont)
NCHOOSE This type of menu item is like NWAY except that the choices are given to the user in a submenu. The list to specify an NCHOOSE menu item that is analogous to the NWAY item above might look like this:
(TYPE NCHOOSE
LABEL FontChoices
ITEMS Helvetica Gacha Modern Classic) SELECTDFN Changefont)
EDITSTART When this type of menu itein is chosen, it activates another type of item, an EDIT item. The EDIT item or items associated with an EDITSTART item have their lD’s listed on the EDITSTART ’s ITEMS property. An example description list is:
(TYPE EDITSTART LABEL "Function to add?" ITEMS (Fn))
EDIT This type of menu item can actually be edited by you. It is often
associated with an EDITSTART item (see above), but the caret that prompts for input will also appear if the item itself is chosen. An EDIT item follows the same editing conventions as editing in
Executive Window:
Add characters by typing them at the caret.
Move the caret by pointing the mouse at the new position, and clicking the left button.
Delete characters from the caret to the mouse by pressing the right button of the mouse. Delete a character behind the caret by pressing the backspace key.
Stop editing by typing a carriage return, a Control-X, or by choosing another item from the menu.
An example description list for this type of item is:
(TYPE EDIT ID Fn LABEL **)
![]()
Grapher is a collection of functions for creating and displaying graphs, networks of nodes and links. Grapher also allows you to associate program behavior with mouse selection of graph nodes. To load this package, type
(FILESLOAD GRAPHER)
Figure 21-1 shows a simple graph.
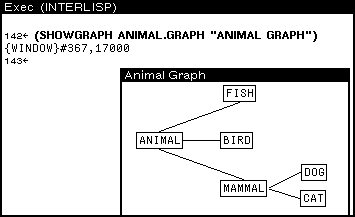
Figure 21-1. Simple Graph
In Figure 21-1 there are six nodes (ANIMAL , MAMMAL, DOG, CAT, FISH, and BIRD)
connected by five links. A GRAPH is a record containing several fields. Perhaps the most
important field is GRAPHNODES —which is itself a list of GRAPHNODE records. Figure 21-2 illustrates these data structures. The window on top contains the fields from the simple
graph. The window on the bottoms an inspection of the node, DOG.

Figure 21-2. Inspecting a Graph and a Node
The GRAPHNODE data structure is described by its text (NODEID ), what goes into it (FROMNODES), what leaves it (TONODES ), and other fields that specify its looks. The basic model of graph building is to create a bunch of nodes, then layout the nodes into a
graph, and finally display the resultant graph. This can be done in a number of ways.
One is to use the function NODECREATE to create the nodes, LAYOUTGRAPH to lay out the nodes, and SHOWGRAPH to display the graph. The primer shows you two simpler ways,
but please see the Library Packages Manual for more information about these other functions. The primer’s first method is to use SHOWGRAPH to display a graph with no nodes or links, then interactively add them. The second is to use the function
LAYOUTSEXPR, which does the appropriate NODECREATES and a LAYOUTGRAPH, with a list.
The function SHOWGRAPH displays graphs and allows you to edit them. The syntax of
SHOWGRAPH is
(SHOWGRAPH graph window lefibuttonfn middlebuttonfn topjustifyflg alloweditflg copybuttoneventfn)
Obviously the graph structure is very complex. Here’s the easiest way to create a graph.
(SETQ MY.GRAPH NIL)
(SHOWGRAPH MY.GRAPH "My Graph" NIL NIL NIL T)
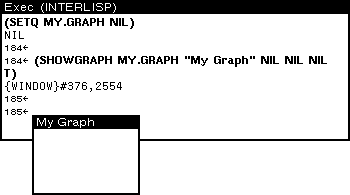
Figure 21-3. My Graph
You will be prompted to create a small window as in Figure 21-3. This graph has the title My Graph. Hold down the right mouse button in the window. A menu of graph
editing operations will appear as in Figure 21-4.

Figure 21-4. Menu of Graph Editing Operations
Here’s how to use this menu. The commands in this menu are easy to learn. Experiment with them!
Start by selecting Add Node . Grapher will prompt you for the name of the node (see Figure 21-5.) and then its position.

Figure 21-5. Grapher Prompts for Name of Node to add after Add Node is Chosen from Graph Editing Menu.
Position the node by moving the mouse cursor to the desired location and clicking a mouse button. Figure 21-6 shows the graph with two nodes added using this menu.

Figure 21-6. Two Nodes Added to MY GRAPH Using GraphEditing Menu
Select Add Link from the graph editing menu. The Prompt window will prompt you to select the two nodes to be linked. (See Figure 21-7.) Do this, and the link will be added.

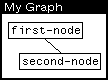
Figure 21-7. Prompt Window Requesting Selection of Two Nodes to Link, and Result
Select Delete Link from the graph editing menu. ThePrompt window will prompt you to select the two nodes that should no longer be linked. (See Figure 21-8.) Do this, and
the link will be deleted.

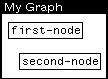
Figure 21-8. Prompt Window Requesting Selection of Link to Delete, and Result
Select Delete Node from the graph editing menu. The Prompt window will prompt you to select the node to be aeleted. (See Figure 21-9.) Do this, and the node will be deletea.
![]()
Figure 21.-9. Prompt to Delete a Node
Select Delete Node from the graph editng menu. Choose a node pointing to the it with the mouse cursor, and pressing and holding the leff mouse button. When you move the mouse cursor, the node will be dragged along. When the node is at the new position,
release the mouse button to deposit the node.
Typically, a graph is used to display one of your program’s data structures. Here is how that is done.
LAYOUTSEXPR takes a list and returns a GRAPH record. The syntax of the function is
(LAYOUTSEXPR sexpr format boxing font motherd personald famlyd)
For example:
(SETQ ANIMAL.TREE ’(ANIMAL (MAMMAL DOG CAT) BIRD FISH)) (SETQ ANIMAL.GRAPH
(LAYOUTSEXPR ANIMAL.TREE ’HORIZONTAL)) (SHOWGRAPH ANIMAL.GRAPH "My Graph" NIL NIL NIL T)
This is how Figure 21.1 was produced.
The Grapher is designed to be built into other programs. It can call functions when, for example, a mouse button is clicked on a node. The function SHOWGRAPH does this:
(SHOWGRAPH graph window lefibuttonfn middlebuttonfn topjustifyflg alloweditflg copybuttoneventfn)
For example, the third argument to SHOWGRAPH , leftbuttonfn, is a function that is called when the left mouse button is pressed in the graph window. Try this:
(DEFINEQ (My.LEFT.BUTT0N.FUNCTION (THE.GRAPHNODE THE.GRAPH.WINDOW)
(INSPECT THE.GRAPHNODE)))
(SHOWGRAPH FAMILY.GRAPH "Inspectable family" (FUNCTION MY.LEFT.BUTTON.FUNCTION)
NIL NIL T)
In the example above, MY.LEFT.BUTTON.FUNCTION simply calls the inspector. The
function should be written assuming it will be passed a graphnode and the window that holds the graph. Try adding a function of your own.
Some other Library packages make use of the Grapher. (Grapher needs to be loaded with the packages to use these functions.)
MASTERSCOPE: The Browser package modifies the Masterscope command, . SHOW PATHS, so that its output is displayed as a graph (using Grapher) instead of simply printed.
GRAPHZOOM: allows a graph to be redisplayed larger or smaller automatically.
![]()
You will find times when one environment simultaneously hosts a number of different programs. Running a demo of several programs, or reloading the entire Medley
environment from floppies when it contains several different programs, are two
examples that could, if you aren’t careful, provide a few problems. Here are a few tips on how to prevent problems:
If you change the value of a system variable, MENUHELDWAIT for example, or connect to a directory other than {DSK}<LISPFILES> , write a function to reset the variable or directory to its original value. Run this function when you are finished working.
This is especially important if you change any of the system menus.
Do not redefine Medley functions or CLISP words. Remember, if you reset an atom’s value or function definition at the top level (in the Executive Window), the message (Some.Crucial.Function.Or.Variable redefined) , appears. If this is not what you wanted, type UNDO immediately!
If, however, you reset the value or function definition of an atom inside your program, a warning message will not be printed.
Make the atom names in your programs as unique as possible. To do this without filling your program with unreadable names that noone, including you, can
remember, prefix your variable names with the initials of your program. Even then, check to see that they are not already being used with the function BOUNDP . For
example, type:
(BOUNDP ’BackgroundMenu)
This atom is bound to the menu that appears when you press the leff mouse button
when the mouse cursor is not in any window. BOUNDP returns T. BOUNDP returns NIL
if its argument does not currently have a value.
Make your function names as unique as possible. Once again, prefixing function
names with the initials of your program can be helpful in making them unique, but even so, check to see that they are not already being used. GETD is the Interlisp-D function that returns the function definition of an atom, if it has one. If an atom has no function definition, GETD returns NIL. For example, type:
(GETD ’CAR)
A non-NIL value is returned. The atom CAR already has a function definition.
Use complete record field names in record FETCHes and REPLACE s when your code is not compiled. A complete record field name is a list consisting of the record
declaration name and the field name. Consider the following example:
(REC0RD NAME (FIRST LAST))
(SETQ MyName (create Name FIRST ’John LAST ’Smith)) (FETCH (NAME FIRST) OF MyName)
Avoid reusing names that are field names of Lisp system records. A few examples of system records follow. Do not reuse these names.
(RECORD REGION (LEFT BOTTOM WIDTH HEIGHT)) (RECORD POSITION (XCOORD YCOORD))
(RECORD IMAGEOBJ (- BITMAP -)))
When you select a record name and field names for a new record, check to see whether those names have already been used.
Call the function RECLOOK, with your record name as an argument, in the Executive Window (see Figure 22-1). If your record name is already a record, the record
definition will be returned; otherwise the function will return NIL.

Figure 22-1. Response to RECLOCK
Call the function FIELDLOOK with your new field name in the Executive Window (see Figure 22-2). If your field name is already a field name in another record, the record definition will be returned; otherwise the function will return NIL.

Figure 22-2. Response to FIELDLOOK
In order for your program to run at maximum speed, you must efficiently use the space available on the system. The following section points out areas that you may not know are wasting valuable space, and tips on how to prevent this waste.
Often programs are written so that new data structures are created each time the
program is run. This is wasteful. Write your programs so that they only create new variables and other data structures conditionally. If a structure has already been
created, use it instead of creating a new one.
Some time and space can be saved by changing your RECORD and TYPERECORD
declarations to DATATYPE . DATATYPE is used the same way as the functions RECORD and TYPERECORD. In addition, the same FETCH and REPLACE commands can be used with the data structure DATATYPE creates. The difference is that the data structure
DATATYPE creates cannot be treated as a list the way RECORD s and TYPERECORDs can.
RESOURCE MANAGEMENT
![]()
Once defined, global variables remain until Lisp is reloaded. Avoid using global
variables if at all possible! One specific problem arises when programs use the function
GENSYM. In program development, many atoms are created that may no longer be useful. Hints:
Use
(DELDEF atomname ’PROP)
to delete property lists, and
(DELDEF atomname ’VARS)
to have the atom act like it is not defined.
These not only remove the definition from memory, but also change the appropriate fileCOMS that the deleted object was associated with so that the file package will not attempt to save the object (function, variable, record definition, and so forth) the next time the file is made. J ust doing something like
(SETQ (arg atomname) ’NOBIND)
looks like it will have the same effect as the second DELDEF above, but the SETQ does not update the file package.
If you are generating atom names with GENSYM , try to keep a list of the atom names that are no longer needed. Reuse these atom names, before generating new ones.
There is a (fairly large) maximum to the number of atoms you can have, but things slow down considerably when you create lots of atoms.
When possible, use a data structure such as a list or an array, instead of many
individual atoms. Such a structure has only one pointer to it. Once this pointer is
removed, the whole structure will be garbage-collected and space will be reclaimed.
If your program is creating circular lists, a lot of space may be wasted. (Many
crosslinked data structures end up having circularities.) Hints when using circular lists:
Write a function to remove pointers that make lists circular when you are through with the circular list.
If you are working with circular lists of windows, bind your main window to a unique global variable. Write window creation conditionally so that if the binding of that
variable is already a window, use it, and only create a new window if that variable is unbound or NIL.
Here is an example that illustrates the problem. When several auxilIary windows are built, pointers to these windows are usually kept on the main window’s property list.
Each auxilIary window also typically keeps a pointer to the main window on its
property list If the top level function creates windows rather than reusing existing ones, there will be many lists of useless windows cluttering the work space. Or, if such a main window is closed and will not be used again, you will have to break the links by deleting the relevant properties from both the main window and all of the auxiliary windows
first. This is usually done by putting a special CLOSEFN on the main window and all of its auxiliary windows.
Typically, if you generato a lot of structure! that won’t get garbage collected, you will eventually run out of space. The important part ii being aNe to track down those
structures and the code that generates them to become more space efficient.
Use the Lisp Library Package GCHAX.DCOM to track down pointers to data structures. The basic idea is that GCHAX will return the number of references to a particular data structure.
A special function exists that allows you to get a little extra space so that you can try to save your work when you get toward the edge (usually noted by a message indicating
that you should save your work and load a new Medley environment). The GAINSPACE
function allows you to delete non-essential data structures. To use it, type:
(GAINSPACE)
into the Executive Window. Answer N to all questions except the followi ng.
Delete edit history
Delete history list.
Delete values of old variables.
Delete your MASTERSCOPE database
Delete information for undoing your greeting.
Save your work and reload Lisp as soon as possible.
![]()
The purpose of this chapter is to show you how to build a moderately tricky interactive interface with the various Medley display facilities. In particular how to move a large
bitmap (larger than 16 x 16 pixels) around inside a window. To do this, you will change the CURSORINFN and CURSOROUTFN properties of the window. If you would also like to then set the bitmap in place in the window, you must reset the BUTTONEVENTFN . This chapter explains how to create the mobile bitmap.
One function that you will use to "trace the cursor" (have a bitmap follow the cursor around in a window) is GETMOUSESTATE. This function finds the current state of the. mouse, and resets global system variables, such as LASTMOUSEX and LASTMOUSEY.
As an example of how this function works, create a window by typing
(SETQ EXAMPLE.WINDOW (CREATEW))
into the Executive Window, and sweeping out a window. Now, type in the function
(DEFINEQ (PRINTCOORDS (W)
(PROMPTPRINT "(" LASTMOUSEX ", "LASTMOUSEY ")") (BLOCK)
(GETMOUSESTATE)))
This function calls GETMOUSESTATE and then prints the new values of LASTMOUSEX and
LASTMOUSEY in the promptwindow. To use it, type
(WINDOWPROP EXAMPLE.WINDOW ’CURSORMOVEDFN ’PRINTCOORDS)
The window property CURSORMOVEDFN, used in this example, will evaluate the function PRINTCOORDS each time the cursor is moved when it is inside the window. The position coordinates of the mouse cursor will appear in the prompt window. (See Figure 23.1.)
Figure 23.1. Current Position Coordinates of Mouse Cursor in Prompt Window
For the bitmap to follow the moving mouse cursor, the function GETMOUSESTATE is advised. When you advise a function, you can add new commands to the function
without knowing how it is actually implemented. The syntax for advise is
(ADVISE fn when where what)
fn is the name of the function to be augmented. when and where are optional
arguments. when specifies whether the change should be made before, after, or around the body of the function. The values expected are BEFORE , AFTER, or AROUND.
what specifies the additional code.
In the example, the additional code, what, moves the bitmap to the position of the
mouse cursor. The function GETNOUSESTATE will be ADVISEd when the mouse moves
into the window. This will cause the bitmap to follow the mouse cursor. ADVISE will be undone when the mouse leaves the window or when a mouse button is pushed. The ADVISEing will be done and undone by changing the CURSORINFN , CURSOROUTFN, and BUTTONEVENTFN for the window.
One last part of the example, to give the impression that a bitmap is dragged around a window, the original cursor should disappear. Try typing:
(CURSOR (CURSORCREATE (BITMAPCREATE 1 l) 1 1]
into the Executive Window. This causes the original cursor to disappear. It reappears when you type
(CURSOR T)
When the cursor is invisible, and the bitmap moves as the cursor moves, the illusion is given that the bitmap is dragged around the window.
To actually have a bitmap trace (follow) the cursor, the environment must be set up so that when the cursor enters the tracing region the trace is turned on, and when the
cursor leaves the tracing region the trace is turned off. The function Establish/Trace/Data will do this. Type it in as it appears (include comments that will help you remember what the function does).
(DEFINEQ (Establish/Trace/Data
[LAMBDA (wnd tracebitmap cursor/rightoffset cursor/heightoffset GCGAGP)
(* * This function is called to establish the data to trace the desired bitmap. "wnd" is the window in which the tracing is to take place, "tracebitmap" is the tracing bitmap, "cursor/rightoffset" and "cursor/heightoffset" are integers which detemine the hotspot of the tracing bitmap.
As "cursor/heightoffset and "cursor/rightoffset" increase the cursor hotspot moves up and to the right.
If GCGAGP is non-NIL, GCGAG will be disabled.)
(PROG NIL
(if (OR (NULL wnd)
(NULL tracebitmap))
then (PLAYTUNE (LIST (CONS 1000 4000))) (RETURN))
(if GCGAGP
then (GCGAG))
(* * Create a blank cursor.)
(SETQ *BLANKCURSOR*(BITMAPCREATE 16 16))
(SETQ *BLANKTRACECURSOR*(CURSORCREATE *BLANKCURSOR*))
(* * Set the CURSOR IN and OUT FNS for wnd to the following:)
(WINDOWPROP wnd (QUOTE CURSORINFN)
(FUNCTION SETUP/TRACE)) (WINDOWPROP wnd (QUOTE CURSOROUTFN)
(FUNCTION UNTRACE/CURSOR))
(* * To allow the bitmap to be set down in the window by pressing a mouse button, include this line.
Otherwise, it is not needed)
(WINDOWPROP wnd (QUOTE BUTTONEVENTFN)
(FUNCTION PLACE/BITMAP/IN/WINDOW)) (WINDOWPROP wnd (QUOTE CURSOROUTFN)
(* * Set up Global Variables for the tracing operation) (SETQ *TRACEBITMAP* tracebitmap
(SETQ *RIGHTTRACE/OFFSET*(OR cursor/rightoffset 0)) (SETQ *HEIGHTTRACE/OFFSET*(OR cxursor heightoffset 0)) (SETQ *OLDBITMAPPOSITION*(BITMAPCREATE (BITMAPWIDTH
tracebitmap)
tracebitmap)))
(SETQ *TRACEWINDOW* wnd]))
(BITMAPHEIGHT
When the function Establish/Trace/Data is called, the functions SETUP/TRACE and
UNTRACE/CURSOR will be installed as the values of the window’s WlNDOWPROPS , and will be used to turn the trace on and off. Those functions should be typed in, then:
(DEFINEQ (SETUP/TRACE [LAMBDA (wnd)
(* * This function is wnd’s CURSORINFN.
It simply resets the last trace position and the current tracing region. It also readvises GETMOUSESTATE to perform the trace function after each call.)
(if *TRACEBITMAP*
then (SETQ *LAST-TRACE-XPOS* -2000) (SETQ *LAST-TRACE-YPOS* -2000)
(SETQ *WNDREGION* (WINDOWPROP wnd (QUOTE REGION))) (WINDOWPROP wnd (QUOTE TRACING)
T)
(* * make the cursor disappear)
(CURSOR *BLANKTRACECURSOR*) (ADVISE (QUOTE GETMOUSESTATE)
(QUOTE AFTER) NIL
(QUOTE (TRACE/CURSOR]))
(DEFINEQ (UNTRACE/CURSOR [LAMBDA (wnd)
(* * This function is wnd’s CURSOROUTFN. The function first checks if the cursor is currently being traced; if so, it replaces the tracing bitmap with what is under it and then turns tracing off by unadvising GETMOUSESTATE and setting the TRACING window property of *TRACEWINDOW* to NIL.)
(if (WINDOWPROP *TRACEWINDOW*(QUOTE TRACING))
then (BITBLT *OLDBITMAPPOSITION* 0 0 (SCREENBITMAP) (IPLUS (CAR *WNDREGION*)*LAST-TRACE-XPOS*) (IPLUS (CADR *WNDREGION*)*LAST-TRACE-YPOS*))
(WINDOWPROP *TRACEWINDOW*(QUOTE TRACING)
NIL))
(* * replace the original cursor shape) (CURSOR T)
(* * unadvise GETMOUSESTATE) (UNADVISE (QUOTE GETMOUSESTATE]))
The function SETUP/TRACE has a helper function that you must also type in. It is
TRACE/CURSOR:
(DEFINEQ (TRACE/CURSOR [LAMBDA NIL
(* * This function does the actual BITBLTing of the tracing bitmap. This function is called after a GETMOUSESTATE, while tracing.)
(PROG ((xpos (IDIFFERENCE (LASTMOUSEX *TRACEWINDOW*)
*RIGHTTRACE/OFFSET*))
(ypos (IDIFFERENCE (LASTMOUSEY *TRACEWINDOW*)
*HEIGHTTRACE/OFFSET*))
(* * If there is an error in the function, press the right button to unadvise the function. This will keep the machine from locking up.)
(if (LASTMOUSESTATE RIGHT)
then (UNADVISE (QUOTE GETMOUSESTATE))) (if (AND (NEQ xpos *LAST-TRACE-XPOS*)
(NEQ ypos *LAST-TRACE-YPOS*))
then
(* * Restore what was under the old position of the trace bitmap)
(BITBLT *OLDBITMAPPOSITION* 0 0 (SCREENBITMAP) (IPLUS (CAR *WNDREGION*)*LAST-TRACE-XPOS*) (IPLUS (CADR *WNDREGION*)*LAST-TRACE-YPOS*))
(* * Save what will be under the position of the new trace bitmap)
(BITBLT (SCREENBITMAP) (IPLUS (CAR *WNDREGION*)
xpos)
(IPLUS (CADR *WNDREGION*) ypos)*OLDBITMAPPOSITION* 0 0)
(* * BITBLT the trace bitmap onto the new position of the mouse)
(BITBLT *TRACEBITMAP* 0 0 (SCREENBITMAP) (IPLUS (CAR *WNDREGION*)
xpos)
(IPLUS (CADR *WNDREGION*)
ypos)
NIL NIL (QUOTE INPUT) (QUOTE PAINT))
(* * Save the current position as the last trace position.) (SETQ *LAST-TRACE-XPOS* xpos)
(SETQ *LAST-TRACE-YPOS* ypos]))
The helper function for UNTRACE/CURSOR , called UNDO/TRACE/DATA, must also be added to the environment:
(DEFINEQ (UNDO/TRACE/DATA [LAMBDA NIL
(* * The purpose of this function is to turn tracing off and to free up the global variables used to trace the bitmap so that they can be garbage collected.)
(* * Check if the cursor is currently being traced. It so, turn it off.)
(UNTRACE/CURSOR)
(WINDOWPROP *TRACEWINDOW*(QUOTE CURSORINFN) NIL)
(WINDOWPROP *TRACEWINDOW*(QUOTE CURSOROUTFN) NIL)
(SETQ *TRACEBITMAP* NIL)
(SETQ *RIGHTTRACE/OFFSET* NIL) (SETQ *HEIGHTTRACE/OFFSET* NIL) (SETQ *OLDBITMAPPOSITION* NIL) (SETQ *TRACEWINDOW* NIL)
(* * Turn GCGAG on) (GCGAG T]))
Finally, if you included the WlNDOWPROP to allow the user to place the bitmap in the window by pressing a mouse button, you must also type this function:
(DEFINEQ (PLACE/BITMAP/IN/WINDOW [LAMBDA (wnd)
(UNADVISE (GETMOUSESTATE))
(BITBLT *TRACEBITMAP* 0 0 (SCREENBITMAP) (IPLUS (CAR *WNDREGION*)
xpos)
(IPLUS (CADR *WNDREGION*)
ypos)
NIL NIL (QUOTE INPUT) (QUOTE PAINT]
That’s all the functions!
To run the functions you just typed in, first set a variable to a window by typing something like
(SETQ EXAMPLE.WINDOW (CREATEW))
into the Executive Window, and sweeping out a new window. Now, set a variable to a bitmap, by typing, perhaps,
(SETQ EXAMPLE.BTM (EDITBM))
Type
(Estab1ish/Trace/Data EXAMPLE.WINDOW EXAMPLE.BTM))
When you move the cursor into the window, the cursor will drag the bitmap.
(If you want to be able to make menu selections while tracing the cursor, make sure
that the hotspot of the cursor is set to the extreme right of the bitmap. Otherwise, the menu will be destroyed by the BITBLT s of the trace functions.)
To stop tracing, do one of the following:
Move the mouse cursor out of the window
Press the right mouse button
Call the function UNTRACE/CURSOR
![]()
As you can tell by now, there are many system variables in Medley that are useful to know. The following sections gather many of the important variables together into
groups relating to directory searching, system flags, history lists, system menus, windows, and, of course, the catchall miscellaneous category.
DISPLAYFONTDIRECTORIES
Its value is a list of directories to search for the bitmap files for display font s. Usually, it contains the FONT directory where you copies the bitmap files (see Chapter 16), and the current connected directory. The current connected
directory is specified by the atom NIL. Here is an example value of
DISPLAYFONTDIRECTORIES.

Figure 24.1. Value for the Atom DISPLAYFONTDIRECTORIES INTERPRESSFONTDIRECTORIES
Is set to a list of directories to search for the font width files for InterPress font s.
DIRECTORIES
This variable is bound to a list of the directories you will be using (see Figure 24-2). The system uses this variable when it is trying to find a file to load. It checks each directory in the list, until the file is foun d. NIL in list means to check the current connected directory.
LISPUSERSDIRECTORIES
Its value is a list of directories to search for library package files.
DWIMIFYCOMPFLG
This flag, if set to T, will cause all expressions to be completely dwinified before the expression is compiled (see Chapter 9). In this state, when the system does not recognize a function of keyword, it will compare the word to a system
maintained list to determine whether the word is a macro, CLISP word, or misspelled user-defined variable.
An example of swinifying before compilation is to convert an IF call to a COND. before they are compiled. Undwimified expressions can cause inaccurate
compilation. This flag is set by the system to NIL. Normally, you want this set to T. For more information on DWIM, refer to the IRM.
SYSPRETTYFLAG
When set to T, all lists returned to the executive window are pretty printed. This flag is originally set by the system to NIL.
CLISPIFTRANFLG
When set to T, keeps the IF expression, rather than the COND translation in your code.
PRETTYTABFLG
When set to T, the pretty printer puts out a tab character rather than several spaces to try to make code align. If NIL, it uses space characters instead.
FONTCHANGEFLG
If NIL, then when pretty printing no font changes will happen (e.g., a smaller font for comments, bold for clip words, and so forth). The default is the atom ALL, so different font s are used where appropriate.
AUTOBACKTRACEFLG
There are many possible values for this variable. They affect when the back
trace window appears with the break window, and how much detail is included in it. The values of this variable include:
NIL, its initial value. The back trace window is not brought up when an error is generated, until you open it yourself.
T, which means that the back trace BT window is opened for error breaks
BT! brings up a back trace window with more detail, BT!, window for error breaks
ALWAYS brings up a backtrace BT window for both error breaks, and breaks caused by calling the function BREAK
ALWAYS! brings up a backtrace window with more detail, BT!, for both error breaks and breaks caused by calling the function
NOSPELLFLG
Is initially bound to NIL, so that DWIM tries to correct all spelling errors,
whether they are in a form you just typed in or within a function being run. If the variable is T, then no spelling correction is performed. This variable is
automatically reset to T when you are compiling a file. If it has some other non-
NIL value, then spelling correction is only performed on type-in.
LISPXHISTORY
Originally set to the list (NIL 0 30 100) , with the following argument
interpretation. The NIL is the list (implemented as a circular queue) to which the top level commands append. 0 is the current prompt number. 30 is the
maximum length of the history list. 100 is the highest number used as a
prompt. This is a system maintained list used by the programmers assistant commands REDO, UNDO, FIX, and ?? use to retrieve past function calls.
To delete the history list, reset the variable LISPXHISTORY to its original value of (NIL 0 30 100).
Setting this variable to NIL disables all the programmers assistant features.
EDITHISTORY
This is also set to (NIL 0 30 100), and has the same description as LISPXHISTORY. This list allows you to UNDO edits. You reset this the same way as LISPXHISTORY.
System menus are all bound to global varieables and are easy to modyfy. If the menu name is set to the NIL value, the menu will be recreated using an items list bound to a global variable.
To change a system menu, edit the items list bound to the appropriate global variable (system menus use this items list with the default WHENSELECTEDFN ), then set the
value of the name to NIL. The next time you need the menu, it will be created from the items list you just edited. The names of system menus and the items lists follow.
BackgroundMenu
This is the variable bound to the menu this displays when you press the right button in the grey background area of the screen.
BackgroundMenuCommands
This list is used for the list of ITEMS for the background menu when it is created.
WindowMenu
This is the variable bound to the default window menu displayed when the right mouse button is pressed inside of a window.
WindowMenuCommands
This is the list of ITEMS for the WindowMenu.
BreakMenu
The menu displayed when the middle mouse button is pressed in a break
window.
BreakMenuCommands
The list of ITEM for the BreakMenu.
PROMPTWINDOW
Global name of the prompt window.
T
Although the value T has several meanings (such as universal TRUE), it also
stands for the standard output stream. As this is usually the executive window, it may be used as the name for the TTY Window at the top level. Mouse
processes have their own TTY Windows. A reference to the window T in a mouse driven function (e.g., a WHENSELECTEFN, Chapter 12) will open a TTY Window for Mouse.
CLEANUPOPTION
This is a list of options that you set to automate clean-up after a work session. Example options are listing files, or recompilation. You will want to keep this set to NIL until you become comfortable with the machine.
FILELST
The list of all the files you loaded.
SYSFILES
The list of all the files you loaded for the SYSOUT file.
INITIALS
An atom you can bind to your name. If bound, the editor will add your name, in addition to the date, in the editor comment at the beginning of each function.
FIRSTNAME
If this variable is set, the system will use it to greet you personally when you log on to your machine.
INITIALSLST
A list of elements of the form (USERNAME . INITIALS) or (USERNAME FIRSTNAME INITIALS). This list is used by the function GREET to set your INITIALS , and your FIRSTNAME when you log in.
#CAREFULCOLUMNS
An integer. PRETTYPRINT estimates the number of characters in an atom,
instead of computing it, for efficiency. Unfortunately, for very long atom names, errors can occur. #CAREFULCOLUMNS is the number of columns from the right within which PRETTYPRINT should compute the number of characters in each
atom, to prevent these errors. Initially this is set to zero. PRETTYPRINT never computes the number of characters in an atom. If you set it to 20 or 30, when PRETTYPRINT comes within 20 or 30 columns of the right of the window, it will begin computing exactly how many characters are in each atom. This will
prevent errors.
DWIMWAIT
Bound to the number of seconds DWIM should wait before it uses the default response, FIXSPELLDEFAULT , to answer its question.
FIXSPELLDEFAULT
Bound to either Y or N. Its value is used as the default answer to questions
asked by DWIM that you don’t answer in DWIMWAIT seconds. It is initially bound to Y, but is rebound to N when DWIMIFYing.
\TimeZoneComp
This is the global variable set to the absolute value of the time offset from Greenwich. For EST, \TimeZoneComp should be set to 5.
![]()
Here are some references to works that will be useful to you in addition to this primer. Some of these you have already been referred to, such as:
The Interlisp-D Reference Manual (IRM)
The Library Packages Manual
The User’s Guide to SKETCH
In addition, you can learn more about Lisp with the books:
Interlisp-D: The l a ngu ago a n d its usage by Steven H. Kaisler. This book was published in 1986 by John Wiley and Sons, NY.
Essenti a l LISP by John Anderson, Albert Corbett, and Brian Reiser. This book was published in 1986 by Addison Wesley Publishing Company, Reading, MA. It was
informed by research on how beginners learn LISP.
The Little Lisper by Daniel P. Friedman and Matthias Felleisen. The second edition of this book was published in 1986 by SRA Associates, Chicago. This book is a
deceptively simple introduction to recursive programming and the flexible data structures provided by LISP.
LISP by Patrick Winston and Berthold Horn. The second edition of this book was published in 1985 by the Addison Wesley Publishing Company, Reading, MA.
LISP: A Gentle Introd uction to Symbolic Comp ut a tion by David S. Touretzky. This book was published in 1984 by the Harper and Row Publishing Company, NY.
Finally, there are three articles about the Interlisp Programming environment:
Power Tools For Programmers byBeau Sheil. It appeared in Datamation in February, 1983, Pages 131 - 144.
The Interlisp Programming Environment by Warren Teitelman and Larry Masinter. It appeared in April, 1981, in IEEE Computer, Volume 14:1, Pages 25 - 34.
Programming In an Interactive Environment, the LISP Experience by Erik
Sandewall. It appeared in March, 1978, in the ACM Computing Surveys, Volume 10:1, pages 35 - 71.
Each of these articles was reprinted in the book Inter active Prog r amming
Environ ments by David R. Barstow, Howard E. Shrobe, and Erik Sandewail. This
book was published in 1984 by McGraw Hill, NY. The first article can be foun d on pages 19 - 30, the second on pages 83 - 96, and the third on pages 31 - 80.
![]()
Medley for the Novice, Release 2.0
25-1